


You may be able to use 6mm² cable if Method 1 (clipped direct) is used.
Remember to up-rate the cable if it runs in thermal insulation in a loft, or for a longer
distance.
3. A means for disconnection in all poles must be incorporated in the fixed wiring in
accordance with the wiring rules. We recommend ceiling switches.
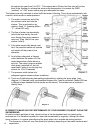
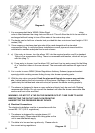
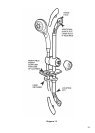
4. Cut back cable as in diagram 10. Connect cable to terminal block making sure that ALL the
retaining screws are VERY tight and that no cable insulation is trapped in the block.
WARNING - FAILURE TO COMPLY WITH THESE
INSTRUCTIONS COULD RESULT IN A FAILURE
OF THE TERMINAL BLOCK AND CABLING.
5. WARNING - THIS APPLIANCE MUST BE
EARTHED.
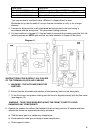
6. Ensure that the removable side section is fitted securely back into the back-plate.
7. Fit the front cover into position making sure the knob is aligned correctly with the flow valve
(see diagram 12).
WARNING - TAKE CARE WHEN REPLACING THE FRONT COVER TO AVOID
DAMAGING ANY COMPONENTS.
8. Operate the shower first without the handset to flush out any particles, fit handset and then
operate the shower as explained previously and check:
a) That the water gets to a satisfactory temperature.
b) Power selection does give a change in water temperature.
c) Check again for leaks.
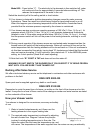
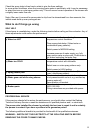
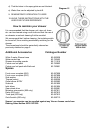
Cable Sizes Fuse/ MCB
7.5 / 6.9kW 240/230V 6mm²
40A Cartridge fuse Type A MCB 14m max
8.5 / 7.8 kW 240/230 V 6mm² 40A Cartridge fuse 14m max Type A MCB 22m max
9.5 / 8.7kW 240/230V 10mm²
40 or 45A Cartridge fuse 22m max
Diagram 11
9