


Page 19For technical questions, please call 1-888-866-5797.ITEM 61725
SAFETYOPERATIONMAINTENANCE SETUP
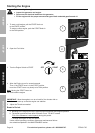
Connecting Loads to the Generator
Load and Circuit Breaker:
1. The total combined load through the outlet
on the Generator must not exceed the
rated maximum power of the unit.
2. Reduce the load if the AC Circuit Breaker turns off.
Once the load is reduced, press the Circuit Breaker
Button to reset the Generator and continue operation.
Calculate Power Draw:
Power draw can be calculated by multiplying volts
and amps. The resulting number is wattage.
• Never exceed the rated maximum wattage for
the Generator or any outlet amperage rating.
• Refer to appliance/tool owner’s manuals to
determine the wattage of electrical load devices.
• Long power cords and extension cords draw
additional power. Keep cord length at a minimum.
Wattage Estimates
Wattages listed below are estimates for that
type of equipment only. Check nameplate wattages
on all loads before connecting to Generator.
This Unit Can Power Any
One of the Following Items:
Running
Watts
Start-up
Watts
1/4 HP Air Compressor 600 900
1/6 HP Motor 500 800
3/8" Drill 400 600
Mini Refrigerator 400 700
Table/Box Fan 200
15 Amp Battery Charger 380
String Trimmer 350
Hedge Trimmer 500
Radio 50
Ten 75 Watt Light Bulbs 750
3. Allow the Engine to run at no load for five minutes
after each start-up to allow the Engine to stabilize.
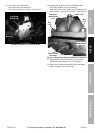
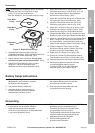
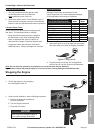
Figure V: Plug Load In
4. Plug the power cord of the 120 volt appliance/
tool into the 120 volt AC Outlet on the Generator.
Note: Do not allow the generator to completely run out of fuel with devices attached.
A generator’s output may sharply spike as it runs out of fuel, causing damage to attached devices.
Stopping the Engine
1. To stop the engine in an emergency,
turn the Engine Switch off.
2. Under normal conditions, use the following procedure:
a. Remove all electrical load devices
from the Generator.
b. Turn the Engine Switch off.
c. Close the Fuel Valve.
NOTICE
See Long-Term Storage on page 23
for complete storage instructions.