


6
ATTACHING THE METAL SHIELD
WARNING:
The metal shield must
be properly installed on the tool any time the
tool is usedwithablade. The forwardtip ofthe
metal shield helps to reduce the occurrence
of blade thrust which can cause seriousinjury
such as amputation to the operator or by-
standers. Failure to install the shield in the
position shown can result in serious injury to
the operator. The length of the shield must be
aligned with the length of the tube.
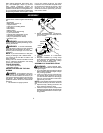
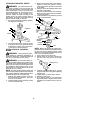
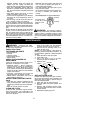
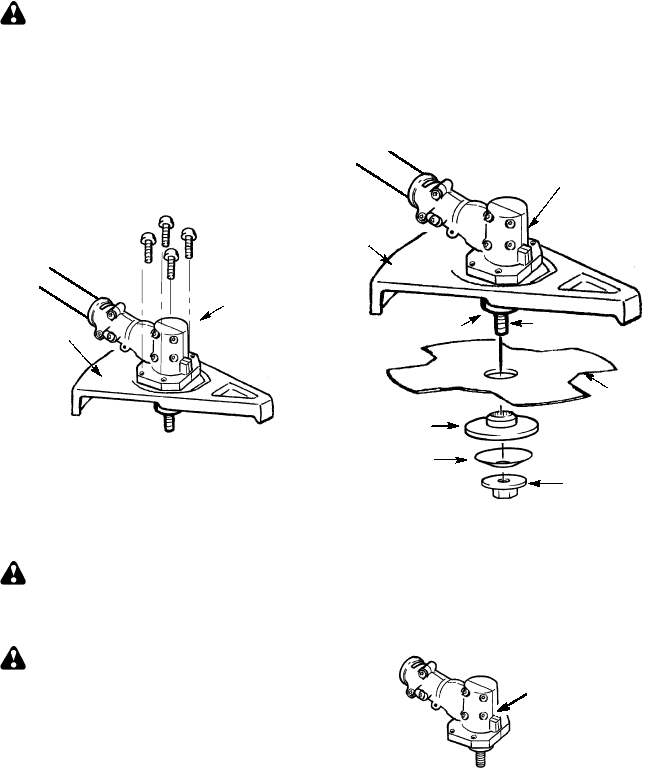
1. Place the metal shield under the gearbox,
and align the screw holes.
Shield
Gearbox
2. Insert and thread the 4 mounting screws
through the holes of the gearbox and the
metal shield. Tighten evenly and secure-
ly with the hex wrench provided.
INSTALLATION OF THE METAL
BLADE
WARNING:
Wear protective gloves
when handl ing o r per form ing maintenance on
the bladeto avoidinjury. Theblade issharpand
can cut you even w hen it is not moving.
WARNING:
Donot use any blades,or
fastening hardware o ther than the washer s and
nuts shown in the followin g illustrations. Thes e
parts must be provided by Poulan/Weed Eater
and installed as shown below. Failure to use
proper parts can cause the blade to fly of f and
seriously hurt you or others.
NOTE:
Thedust cupand retainingwasherare
located onthe gear boxshaftand notin thepar ts
bag. All o therfasteners m entionedinthe follow-
ing assembly steps are in the par ts bag.
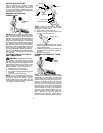
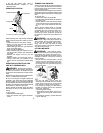
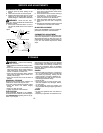
1. Remove the retaining washer from the
threaded shaft of the gearbox. Leave the
dust cup on the shaft.
2. Install the blade and the retaining washer
over the threaded s haft.
3. Make sure the raised part of the retaining
washer is facing the gearbox and the
raised area fits into the hole in the center
of the blade.
4. Slide the blade and retaining w asher onto
the shaft of the gearbox.
5. Place the cupped washer onto the shaft.
Make surethecupped side of the washer
is toward the blade.
6. Install the blade nut bythreading onto the
shaft counterclockwise.
Shield
Blade
Retaining
Washer
Dust Cup
Cupped
Washer
Nut
Threaded Shaft
Gearbox
NOTE:
Make sure all par ts are in place as il-
lustrated, and the bladeis sandwichedbetween
the dust cup and the retaining w asher. There
should be no space between the blade and the
dust cup or the r etaining washer.
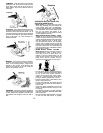
7. Push in locking lever and hold.
8. Rotate blade nut until the locking lever
falls into one of the grooves in the dust
cup.
Locking Lever
9. C ontinue to hold in locking lever. This w ill
keep the shaft fromturning while tightening
the blade nut.
10. Tighten blade nut firmly with a wrench.
11. Release locking lever.
12. Tur n blade by hand. If the blade binds
againsttheshield,orappearsto beuneven,
the blade is not centered, and you m ust r e-
install.