10
Coupler Primary Hole
Upper
Shaft
Locking/
Release
Button
Attachment
Guide Recess
WARNING: Make sure the locking/
release button is locked in the primary hole
and theknob is securely tightened before o p -
erating the unit. Al l attachments a re designed
to be used in the primary hole unless otherwise
stated in the applicable attachment instruction
manual. Using the wronghole couldlead toseri-
ous injury or damage to the unit.
Locking/Release
Button in Primary Hole
Secondary Hole
OPERATING INSTRUCTIONS
It is recommended that the engine not b e
operated for longer than 1 minute at full
throttle.
OPERA TING POSITION
Cut on l
y
f
rom
y
our le
f
tto
y
our ri
g
ht.
ALWAYS WEAR:
Long Pants
Heavy shoes
Eye Protection
Hearin g
Protection
WARNING: Always weareyeprotec-
tion. Never lean over the trimmer head.
Rocks ordebris canricochetor bethrowninto
eyes and face and cause blindness o r other
serious injury .
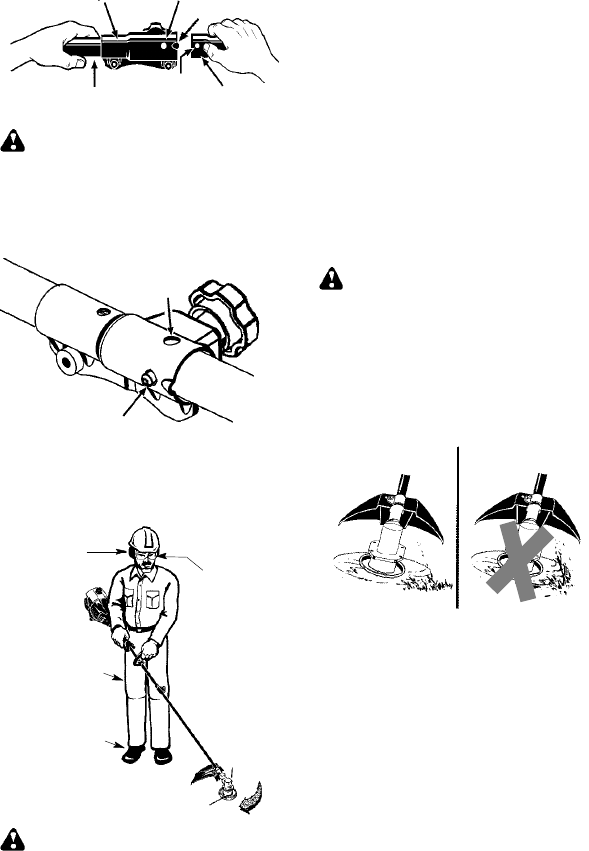
When operating unit, stand as shown and
check for the following:
S W ear eye protection and heavy clothing.
S Holdtrigger handlewithyourrighthandand
assit handle with left hand.
S Keep unit below waist level.
S Cut only from your left to your r ight to
ensure debris is thrown away from you.
Without bending over, keep line near and
parallel to the ground and not crowded into
material being cut.
Do not run the engine a t a higher speed than
necessary. The cutting line will cut efficiently
when the engine is run at less than full throttle.
At lower speeds, there is less engine noise and
vibration. The cutting line will last longer and will
be less likely to “weld” onto the spool. Always
release the throttle trigger and allow the en-
gine to return to idle speed when not cutting.
To stop engine:
S Release the throttle trigger.
S Move the ON/OFF switch to the OFF posi-
tion.
CUTTING METHODS
WARNING: Use minimum speed
anddo notcrowdthelinewhen cuttingaround
hard objects (rock, gravel, fence posts, etc.),
whichcandamagethetrimmerhead,become
entangled in the line, or be thrown causing a
serious hazard.
S The tip of the line does the cutting. You will
achieve the best performance and mini-
mum linewear by not crowding the lineinto
the cutting area. The right and wrong ways
are shown below.
Tip of the line
does the cutting.
Right Wr ong
Line crowded into
work area.
S The line will easily remove grass and
weedsfromaroundwalls,fences, treesand
flower beds, but it also can cut the tender
bark of trees or shrubs and scar fences.
S For trimming or scalping, use less than full
throttle to increase line life and decrease
head wear, especially:
S During light duty cutting.
S Near objects around which the line can
wrap such as small posts, trees o r fence
wire.
S Formowingor sweeping, usefullthrottlefor
a good clean job.
TRIMMING -- Hold the bottom of the trimmer
head about 3 inches (8 cm) above the ground
and at an angle. Allow only the tip of the line to
make contact. Do not force trimmer line into
work area.


