


GB
9
Warm engines will cause condensation in cold
weather. To prevent possible freeze--up of recoil
starter and engine controls, proceed as follows
after each snow removal job.
1. Run the snow thrower a few minutes after
throwing snow to prevent freeze--up of the
auger/impeller.
2. With engine off, allow engine to cool for sev-
eral minutes.
3. Pull starter rope very slowly until resistance
is felt, then stop. Allow the starter rope to re-
coil. Repeat three times.
4. With the engine not running, wipe all snow
and moisture from the carburetor cover in
area of controls and levers. Also, move the
choke control and starter handle several
times.
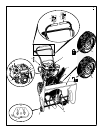
How To Remove Snow or Debris From
The Auger Housing
WARNING: Do not attempt to re-
move snow or debris that may be-
come lodged in auger housing with
your hands. Use the clean--out tool or a pry
bar to remove snow or debris.
(Figure 21) On some models, a clean--out tool
(1) is attached to the top of the auger housing.
Use the clean--out tool (1) to remove snow
from the auger housing.
1. (Figure 1) Release the auger drive lever
(5).
2. Pull out the safety key (8).
3. Disconnect the spark plug wire.
4. Do not place your hands in the auger hous-
ing (4) or the discharge chute (3).
5. (Figure 21) Use the clean--out tool (1) or a
pry bar to remove any snow or debris.
Snow Throwing Tips
1. For maximum snow thrower efficiency in re-
moving snow, adjust ground speed. Go
slower in deep, freezing or wet snow. If the
wheels slips, reduce forward speed.
2. Most efficient snow throwing is accomplished
when the snow is removed immediately after
if falls.
CAUTION: Do not overload the machine
capacity by attempting to clear snow at
too fast a rate.
3. For complete snow removal, slightly overlap
each previous path.
4. Whenever possible, discharge the snow
down wind.
5. For normal usage, set the skids so that the
scraper bar is 1/8” above the skids. For ex-
tremely hard--packed snow surfaces, adjust
the skids upward so that the scraper bar
touches the ground.
6. Rocks and gravel must not be picked up and
thrown by the machine. On gravel or crushed
rock surfaces, set the skids at 1 --1/4 inch be-
low the scraper bar. See “How To Adjust The
Height Of The Skids” in the Maintenance
section.
7. After each snow throwing job, allow the en-
gine to idle for a few minutes. The snow and
accumulated ice will melt off the engine.
8. Clean the snow thrower after each use.
9. Remove ice, snow and debris from the entire
snow thrower. Flush with water to remove all
salt or other chemicals. Wipe snow thrower
dry.
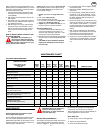
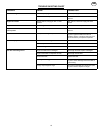
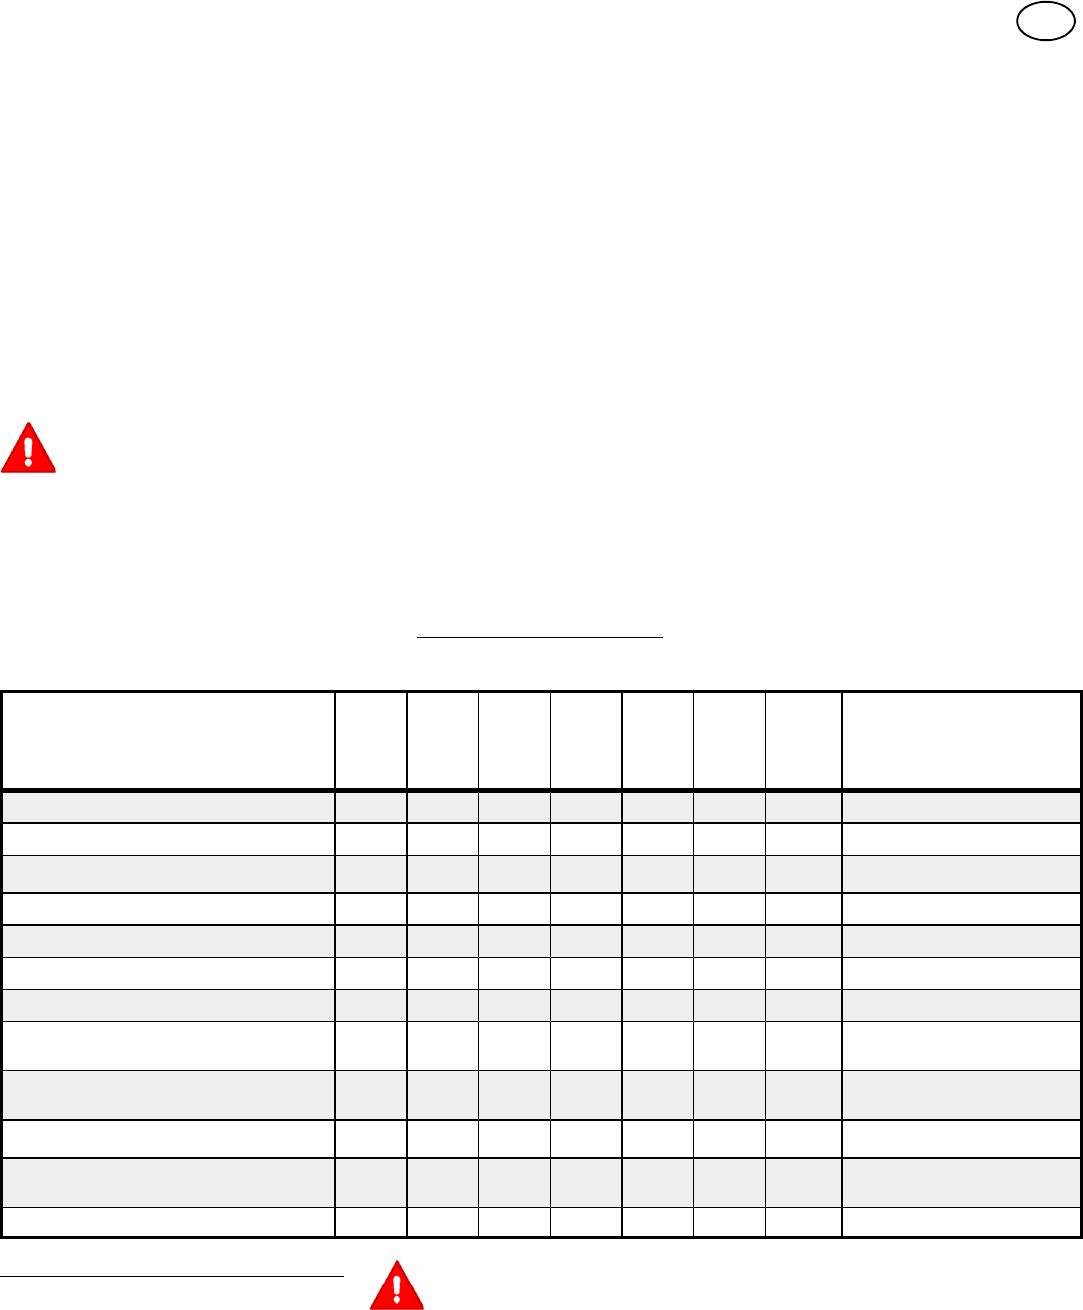
MAINTENANCE CHART
CUSTOMER RESPONSIBILITIES
SERVICE RECORDS
Fill in dates as you
complete regular
service.
Before
Each
Use
First
2
Hours
Every
5
Hours
Every
10
Hours
Every
25
Hours
Each
Season
Before
Storage
SERVICE DATES
Check Engine Oil Level
√ √ √
Change Engine Oil
√ √
Check And Tighten All Screws and Nuts
√ √
Check Spark Plug
√ √
Adjust Drive Belt
√ √ √
Check Fuel
√
Drain Fuel
√
Check Auger Clutch Cable Adjustment
(See Cable Adjustment)
√ √
Check Traction Clutch Cable Adjustment
(See Cable Adjustment)
√ √
Lubricate All Pivot Points
√
√
Lubricate Auger Shaft
(See Shear Bolt Replacement)
√ √
Lubricate Drive Chains and Sprockets
√ √
MAINTENANCE
NOTE: Illustrations are located on page 2
and on pages 30 through 35.
Use the following maintenance section to keep
your unit in good operating condition. All the
maintenance information for the engine is in the
engine manufacturer ’s instructions. Before you
start the engine, read this book.
WARNING: Before you make an in-
spection, adjustment (except
carburettor), or repair, disconnect
thewirefromthesparkplug.
General Recommendations
The warranty on this snow thrower does not cov-
er items that have been subjected to operator
abuse or negligence. To receive full value from
the warranty, the operator must maintain the
snow thrower as instructed in this manual.
Some adjustments must be made periodically to
properly maintain the snow thrower.
After Each Use
G Check for any loose or damaged parts.
G Tighten any loose fasteners.
G Check and maintain the auger.