


15
NOTE: It is normal for a small amountof oil
to appear under the saw after engine stops.
Do not confuse this with a leaking oil tank.
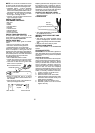
S ON/ST OP Switch -- Ensure ON/STOP
switch functions properly by moving the
switch to th e S TOP position. Make sure en-
gine stops; then restart engine andcontinue.
S Fuel Tank -- Do not use saw if fuel tank
shows signs of damage or leaks.
S Oil Tank -- Donot usesaw ifoil tank shows
signs of damage or leaks.
CHECK FOR LOOSE
FASTENERS AND PARTS
S Bar Nuts
S Chain
S Muffler
S Cylinder Shield
S Air Filter
S Handle Screws
S Vibration Mounts
S Starter Housing
S Front Hand Guard
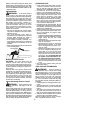
CHECK CHAIN SHARPNESS
A sharp chain makes wood chips. A dull
chain makes a sawdust powder and cuts
slowly. See CHAIN SHAR PEN ING .
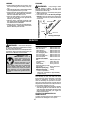
CHECK GUIDE BAR
Conditions which require guide bar mainte-
nance:
S Saw cuts to one side or at an angle.
S Saw has to be forced through the cut.
S Inadequate supply of oil to bar/chain.
Check the condition of guide bar each time
chain is sharpened. A worn guide bar will
damage the c hain and make cutting difficult.
After each u se, ensure ON/STOP switch is
in the STOP position, thenclean all sawdust
from the guide bar and sprocket hole.
To maintain guide bar:
S MoveON/STOPswitchtoSTOP.
S Loosen and remove bar nuts and clutch
cover. Remove bar and chain fr om saw.
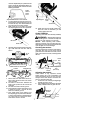
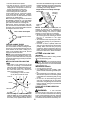
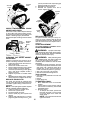
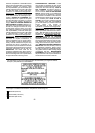
S Clean the oil holes and bar groove after
each 5 hours of operation.
Remove Sawdust From
Guide Bar Groove
Oil Holes
S Burring of guide bar rails is a normal
process of rail w ear. Remove these burrs
with a flat file.
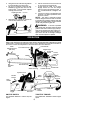
S When railtopis uneven, use aflatfile tore-
store square edges and sides.
Correct GrooveWorn G roove
File Rail Edges
and Sides
Square
Replace guide bar when the groove is worn,
the guide bar is bent or cracked, or when ex-
cess heating or burring of the rails occurs. If re-
placement is necessary , use only the guide bar
specified for your saw i n t he repair par ts list or
on the decal located on the chain saw .
CHECK FUEL MIXTURE LEVEL
S See FUELING ENGINE under the OP-
ERA TION section.
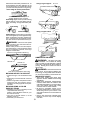
LUBRICATION
Bar Oil
Fill Cap
S See GUIDE BAR AND CHAIN OIL under
the OPERA TION section.
INSPECT AND CLEAN UNIT AND
DECALS
S After each use, inspect complete unit for
loose or damaged parts. Clean the unit and
decals using a damp cloth with a mild deter-
gent.
S Wipe off unit with a clean dry cloth.
CHECK CHAIN BRAKE
See CHAIN BRAKE in the OPERATION
section.
CLEAN AIR FILTER
CAUTION:
Donotcleanfilterin gasolineor
other flammable solvent to avoid creating a
fire hazard o rproducing harmfulevaporative
emissions.
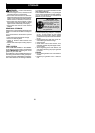
Cleaning the air filter:
A dirty airfilter decreases the life and perfor-
mance of the engine andincreases fuelcon-
sumption and harmful emissions. Always
clean your air filter after 1 0 tanks of fuel or 5
hours of operation, whichever comes first.
Clean more frequently industy conditions.A
used air filter can never be completely
cleaned. It is adv isable to replace your air fil-
ter witha new oneafterevery 50hours ofop-
eration, or annually, w hichever comes first.
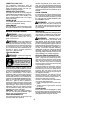
1. Loosen 3 screws on cylinder cover.
2. Remove cylinder cover.
3. Remove air filter cover and air filter.
4. Cleanthe airfilter usinghot soapy water.
Rinsewithcleancoolwater.Air drycom-
pletely before reinstalling.
5. Reinstall air filter and air filter cover.
6. Reinstall cylinder cover and 3 screws.
Tighten securely.