


9
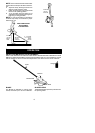
MAINTENANCE
WARNING: Always stop unit and dis-
connect spark plug wire before performing
maintenance.
CHECK FOR DAMAGED OR
WORN PARTS
Contact an authorized service dealer for re-
placement of damaged or worn parts.
S BladeShield -- Discontinueuseof brushcut-
ter attachment if shield is damaged.
CHECK F OR LOOSE FAST E NER S
AND PARTS
S Blade nut
S Fasteners
INSPECT AND CLEAN UNIT
AND DECAL S
S After each use, inspect complete unit for
loose or damaged parts. Clean the unit and
decals using a damp cloth witha mild deter-
gent.
S Wipe of f unit with a clean dry cloth.
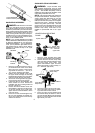
BLADE MAINTENANCE
WARNING: The blade will continue to
spin after the engine stops or after thethrottle
trigger has been released. To avoid serious
injury, m ake sure the blade has stopped
coastinganddisconnect thespark plugbefore
performing work on the blade.
WARNING: Always replace a blade
thatis bent, warped,cracked, broken, ordam-
aged in any other way. Never attempt to
straighten and reuse a damaged blade. Use
only specified replacement blade. Wear pro-
tective gloves when handling or performing
maintenance on the blade to help avoid injury .
S Check blade for flatness periodically. Lay
the blade on a flat surface to inspect for flat-
ness. Throw away a blade that is not flat.
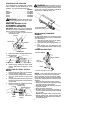
SERVICE AND ADJUSTMENTS
BLADE REPLACEMENT
WARNING: The bladewill continue to
spin after the engine stops or after thethrottle
trigger has been released. To avoid serious
injury, make sure the blade has stopped
coastinganddisconnect thespark plugbefore
performing work on the blade.
WARNING: Wear protective gloves
when handling or performing maintenance on
the b lade to avoid injury. The blade is sharp and
can cut you even when it i s not moving.
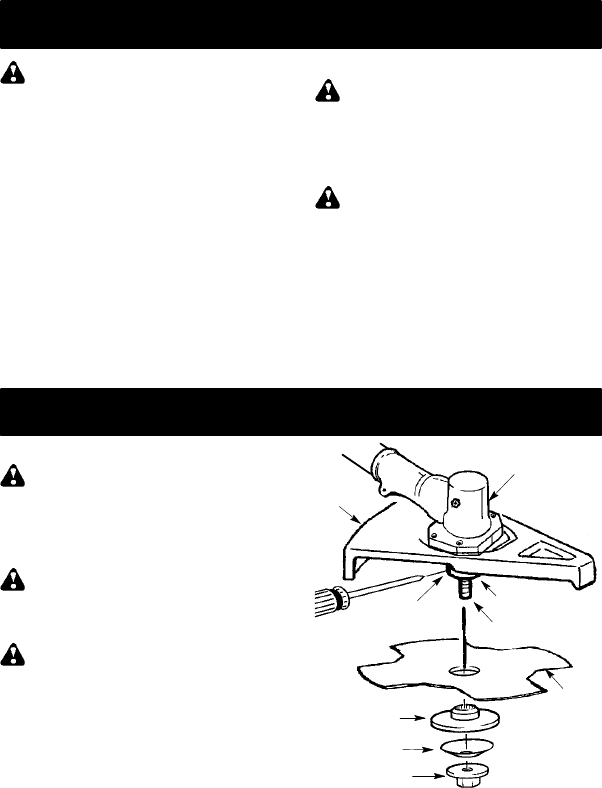
WARNING: Do not use any blades, or
fastening hardware other than the washers and
nuts shown in the following illustration. These
parts must be provided by Poulan PRO and
installed as shown. Failure to use proper parts
can cause the blade to fly off and seriously hurt
you o r o thers.
1. Toremovetheblade,alignholein thedust
cup with the hole in the side of the gear-
box by rotating the blade.
2. Insert a small screwdriver into aligned
holes. This will keep the shaft from turn-
ing while loosening the blade nu t.
3. While holding the screwdriver in position,
remove bladenut by turningclockwiseas
you are facing the nut.
4. Remove both washers and the blade
from the blade shaft. Leave the dust cup
on the gearbox.
5. Install new blade and retaining washer onto
the threaded shaft e xtending from the gear-
box (blade must be between the dust cup
and the retaining washer). Make sure the
raised part of the retaining washer is facing
the gearbox, and theraised areafits intothe
hole in t he center of the blade.
Shield
Blade
Retaining
washer
Aligned holes
Cupped
washer
Nut
Threaded shaft
Gearbox
Dust cup
6. Place the cupped washer onto the shaft.
Make sure thecupped side of thewasher
is toward the blade.
7. Install blade nut by threading onto the shaft
counterclockwise as you are facing thenut.
NOTE: Makesureallparts arein place asillus-
trated, andthe blade is sandwiched between the
dust cup and the retaining washer. There should
be no space between the blade and the dust cup
or the retaining washer .
8. Tighten blade nut firmly with a wrench
while holding screwdriver in position.
9. Remove the screwdriver.
10. Turn blade by hand. If the blade binds
against the shield, or appears to be un-
even, the blade is not centered, and you
must reinstall.