


-- 7 --
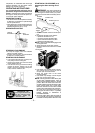
5. Adda few drops ofoil tothe filter;squeeze
filter to distribute oil.
6. Replace parts.
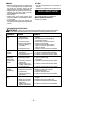
INSPECT MUFFLER AND SPARK
ARRESTING SCREEN
WARNING: The muffler on this prod-
uct contains chemicals known to the State of
California to cause cancer.
As your unit isused, carbon deposits buildup
on the muffler and spark arresting screen.
For normal homeowner use, however , the
muffler andspark arresting screen willnot re-
quire any service. After 50 hours of use, we
recommend that your muffler be serviced or
replaced by your authorized service dealer.
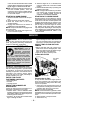
CARBURETOR IDLE SPEED
ADJUSTMENT
WARNING: Keep others away when
making idle speed adjustments. The blade
will be moving during most of this procedure.
Wear your protectiveequipment andobserve
all safety precautions. When making adjust-
ments, use a screwdriver short enough to
keep your hands behind the handguard and
away from the blade. After making adjust-
ments, theblademustnot m oveatidlespeed.
The carburetor has been carefully set at the
factory.Adjustments may benecessary ifyou
notice any of the following conditions:
S Engine will not idle when the throttle i s re-
leased.
S The blade moves at idle.
Keep others away when making idle speed ad-
justments. Make adjustments with the unit rest-
ing on a level surface free of debris that can be
caughtin thehedgetrimmer blade. Serious inju-
ry to the operator and others can occur if the
carburetor is not properly adjusted. Keep all
parts of your body away from the blade and
muffler .
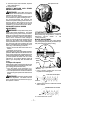
To adjust idle speed:
Allow e nginetoidle.Adjust speeduntilengine
runswithoutblademoving(idletoofast) oren-
gine stalling (idle speed too slow).
S T urn idle speed screw clockwise to in-
creaseenginespeedifenginestalls ordies.
S T urn idle speed screw counterclockwise to
decrease engine speed if the blade moves
at idle.
WARNING: Recheck the idle speed
after each adjustment. The blade must not
move at idle speed to avoid serious injury to
the operator or others.
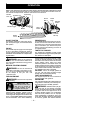
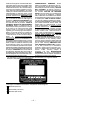
Idle Speed Screw
Ifyourequirefurtherassistanceorareunsure
about performing this procedure, contact an
authorized service dealer or call
1--800--554--6723.
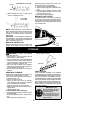
BLADE ADJUSTMENT
The clearance between the cutting blades
must beadjustedperiodicallytomaintainopti-
mal performance and sharp cutting.
Blade
guide
Bolt
Blades
Cupped
Washer
Flat
Washer
Blade guide
Nuts
Nut
1. Using a wrench, loosen each nut on the
top side of the blade guide.
Wrench
Nut
TOPSIDEOFBLADE
2. Tighten each bolt from underside of blade
with a wrench.
UNDERSIDE OF BLADE
Bolt
3. Loosen each bolt 1/2 turn.