


5
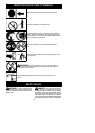
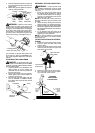
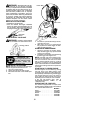
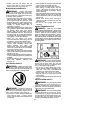
S Always keep engineon the right--hand side
of your body.
S Hold the unit firmly with both hands.
S Keepfirm footingand balance.Do notover-
reach.
S Keep blade or trimmer head below waist
level. Do not raise engine above your waist.
S Keep all parts of your body away from
blade, trimmer head, and muffler when en-
gineis running. Ahot mufflercancausese-
rious burns.
S Cut from your left to your right. Cutting on
right side of the shield will throw debris
away from the operator.
S Use only in daylight or good artificial light.
S Use only for jobs explained in this m anual.
TRANSPORTING AND STORAGE
S Stop the unit before carrying.
S Keep muffler away from your body.
S Allowtheengine tocool andsecure theunit
before storing or transporting itin avehicle.
S Empty the fueltank before storing or trans-
portingthe unit.Useupfuel leftin thecarbu-
retor by starting the engineand lettingit run
until it stops.
S Store unit so the blade or line limiter blade
cannot accidentally cause injury. The unit
can be hung by the shaft.
S Store unit out of reach of children.
WARNING: The engine exhaust
from this product contains chemicals known
totheStateofCaliforniatocause cancer ,birth
defects or other reproductive harm.
SAFETY NOTICE: Exposure to vibrations
through prolonged use of gasoline powered
hand tools could cause blood vessel or nerve
damage in the fingers, hands, and joints of
people p rone to circulation d isorders or abnor-
mal swellings. Prolonged use in cold weather
has been linked to blood vessel damage in
otherwise healthy peopl e. If symptoms occur
such as numbness, pain, loss of strength,
change in skin color or texture, or loss of feeling
in the fingers, hands, or joints, discontinue the
use of this tool and seek medical attention. An
anti--vibration system does not guarantee the
avoidance of these problems. Users who oper-
ate power tools on a continual a nd regular basis
must monitor closely their physical condition
and th e condition of this tool.
SPECIAL NOTICE: This unit is equipped
with a tempe rature lim iting m uf flerand spark ar-
resting screen which meets the requirements of
California Codes 4442 and 4443. All U.S. forest
land and the states of California, Idaho, Maine,
Minnesota, New Jersey, Oregon, and W ashing-
ton require by law that many internal combus-
tion engines be equipped with a spark arresting
screen. If you operate in a locale where such
regulations exist, you are legally responsible for
maintaining the operating condition of these
parts. Failure to do so is a violation of the law .
For normal homeowner use, the muffler and
spark arresting screen will not require any ser-
vice. After 50 hours of use, we recommend that
your muffler be serviced or replaced by your au-
thorized service dealer.
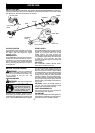
ASSEMBLY
CARTON CONTENTS
Check carton conte nts against t he foll owinglist:
S Powerhead
S Lower attachment (with trimmer head
installed)
S Cupped washer
S Large nut for installing blades
S Hex wrench
S Handlebar
S Bracket cover
S Bracket cover screws (2)
S Metal blade shield
S Blade shield screws (4)
S 4--point weed blade
S Plastic shield
S Wing nut (screwed onto plastic shield)
S Shoulder strap with warning
S Container of oil
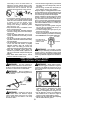
WARNING: Alwaysstopunit anddis-
connectspark plugbefore performinganyas-
sembly procedures.
WARNING: If received assembled,
repeat allsteps toensure your unitis properly
assembled and all fasteners are secure.
Examine parts for dam age. Do not use dam-
aged parts.
NOTE: If you need assistance or find parts
missing or damaged, call 1-800-554-6723.
It is normal for the fuel filter to rattle in the
empty fuel tank.
Finding fuelor oil residue on muffler isnormal
due to carburetor adjustments and testing
done by the manufacturer.
TOOLS REQUIRED
S Hex wrench (provided)
S Adjustable wrench
S Phillips screwdriver
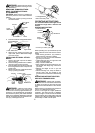
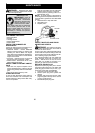
INSTALLING BRUSHCUTTER
ATTACHMENT
CAUTION:
When installing brushcutter at-
tachment, place the unit on a flat surface for
stability .
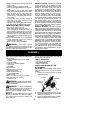
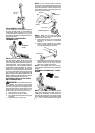
1. Loosen the coupler by turning the knob
counterclockwise.
Coupler
Knob
LOOSEN
TIGHTEN
Shipping
protector
2. Remove shipping protector fromcoupler.
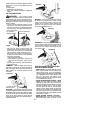
3. Remove the shaft cap from t hebrushcutter
attachment (if present).
4. Position locking/release buttonof attach-
ment into guide recess of coupler .