


13
MAINTENANCE
W ARNING:
Disconnect the spark
plug before performing maintenance except
for carburetor adjustments.
HELPFUL TIP
IMPORTANT:
Have all
repairs other than the rec-
ommended maintenance
described in the instruction
manual performed by an
authorized service dealer.
If any dealer other than an authorized
service dealer performs work on the
product, Electrolux Home Products,
Inc., may not pay forrepairs under war-
ranty. Itis yourresponsibility tomaintain
and perform general maintenance.
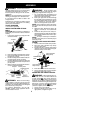
CHECK FOR LOOSE
FASTENERS AND PARTS
S
Spark Plug Boot
S
Air Filter
S
Housing Screws
S
Assist Handle Screw
CHECK FOR DAMAGED OR
WORN PARTS
Contact an authorized service dealer for re-
placement of damaged or worn parts.
S
ON/OFF switch -- Ensure ON/OFF switch
functions properly by moving the switch to
the OFF position. Make sure enginestops;
then restart engine and continue.
S
Fuel tank -- Discontinue use of unit if fuel
tank shows signs of damage or leaks.
S
Oil tank -- Discontinue use of unit if oil tank
shows signs of damage or leaks.
INSPECTAND CLEANUNIT ANDLA-
BELS
S
After each use, inspect complete unit for
loose o rdamagedparts. Cleantheunitand
labels using adampcloth with a mild deter-
gent.
S
Wipe off unit with a clean dry cloth.
CHECK CHAIN TENSION
W ARNING:
Wear protective gloves
when handlingchain. The chain is sharpand
cancut youeven whenit is notmoving. Make
chain adjustments with lower end supported.
Chain tension is very important. Chains
stretchduringuse. This i sespecially truedur-
ing t hefirstfewtimes youuse y ourpruner. Al-
ways check chain tension eachtime you use
and refuel your unit.
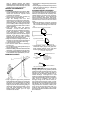
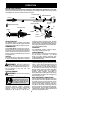
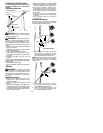
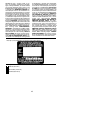
1. Use the screwdriver end of the chain ad-
justment tool (bar tool) to move chain
around guide bar to ensure kinks do not
exist. The chain should rotate freely.
Chain Adjustment Tool
Guide
Bar
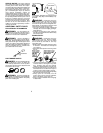
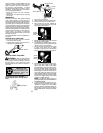
2. Loosenbar clamp nutuntil it is finger tight
against the bar clamp.
Bar clamp nut
Adjusting Screw
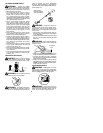
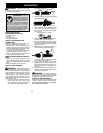
3. Turn adjusting screw clockwise until
chain solidly contacts bottomofguidebar
rail. Then, turn adjusting screw an addi-
tional 1/4 turn.
Adjusting Screw -- 1/4 Turn
4. Using bar tool, roll chain around guide bar
to ensure all links are in bar groove.
5. Lift up tip of guide bar to check for sag.
Release tip of guidebar,then turnadjust-
ingscrew1/4turnclockwise. Repeatuntil
sag does not exist.
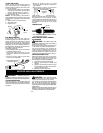
6. While lifting tip of guide bar, tighten bar
clamp nut securely with the bar tool.
7. Use thescrewdriver endof thebar toolto
move chain around guide bar.
8. If chain does not rotate, it is too tight.
Slightly loosen bar clamp nut and loosen
chain by turning the adjusting screw 1/4
turn counterclockwise. Retighten bar
clamp nut.
9. If chain is too loose, it will sag below the
guide bar and needs to be tightened fol-
lowing above procedure.
W ARNING:
DO NOT ope ra te the
pruner if thecha in is loose. I f thepruner is oper-
atedwith a loose chain, the chain could jump of f
the guide bar and result in serious injury.
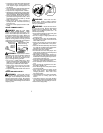
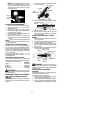
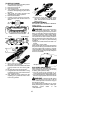
CHECK CHAIN SHARPNESS
Asharpchain makeswoodchips.A dullchain
makes a sawdust powder and cuts slowly.
See CHAIN SHARPENING in the SER VICE
AND ADJUSTMENTS section.