


8
SERVICE AND ADJUSTMENTS
BLADE REPLACEMENT
WARNING:
The blade will continue to
spin after the engine stops or after the throttle
trigger has been released. To avoid serious
injury, make sure the blade has stopped
coasting anddisconnect thesparkplug before
performing work on the blade.
WARNING:
Wear protective gloves
when handling or per form ing maintenance on
the blade to avoidinjury. Theblade is shar pand
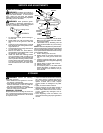
can cut you even when it is not moving.
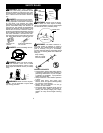
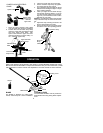
Locking Lever
GEARBOX
1. To remove the blade, push in locking le-
ver and hold.
2. Rotate blade nut until the locking lever
falls into one of the grooves in the dust
cup.
3. Continue tohold in locking lever. This will
keep the shaft from turning while loosen-
ing the blade nut.
4. Loosen blade nut byturning clockwise as
you are facing the nut.
5. Remove the blade nut, both washers,
andtheblade fromthe bladeshaft. Leave
the dustcup on the gearbox.
6. Install new blade and retaining washer
onto the threaded shaft extending from
the gearbox (blade must be between the
dust cup andthe retaining washer). Make
sure theraised partof the retaining wash-
er is facing the gearbox, and the raised
area fits into the hole in the center of the
blade.
Shield
Blade
Retaining
Washer
Dust Cup
Cupped
Washer
Nut
Threaded Shaft
Gearbox
7. Place the cupped washer onto the shaft.
Make sure thecupped side of thewasher
is toward the blade.
8. Install blade nut by threading onto the
shaft counterclockwise as you are facing
the nut.
NOTE:
Mak esur eallpartsareinplaceasillus-
trated, andthebladeis sandw ichedbetweenthe
dust c up andthe retainingwasher. Thereshould
beno spacebetweentheblade andthedustcup
or the retaining washer.
9. Push in locking lever and hold.
10. Rotate blade nut until the locking lever
falls into one of the grooves in the dust
cup.
11. Continue to hold in locking lever. This will
keep the shaft from turning while tightening
the blade nut.
12. Tighten blade nut firmly with a wrench.
13. Release locking lever.
14. Turn blade by hand. If the blade binds
against the shield, or appears to be un-
even, the blade is not centered, and you
must reinstall.
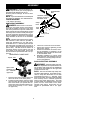
STORAGE
WARNING:
Perform the following
steps after each use:
S
Allow attachment and gearbox to cool be-
fore storing or transporting.
S
Store attachment with blade shield in place.
Position attachment so that any sharp ob-
ject cannot accidentally cause injury.
S
Store the attachment inadry,well ventilated
area out of the reach of children.
SEASONAL STORAGE
Prepare attachment for storage at end of sea-
son orif it will not be used for 30days ormore.
If your brushcutter attachment is to be stored
for a period o f time:
S
Clean the entire attachment.
S
Inspect the blade shield area and clean any
dirt, grass, leaves, or debris that has col-
lected. Inspect the blade and blade shield;
replace a blade that is bent, warped,
cracked, broken or damaged in any other
way .
S
Lightly oil external metal surfaces.
S
Apply acoating of oil to the entire surface of
the blade; wrap it in heavy paper or cloth.
S
Check entire attachment for loose screws
or nuts. Replace any damaged, worn or
broken parts.
S
At the beginning of the next season, use
only fresh fuel having theproper gasoline to
oil ratio.