


3-3
3.3.1. With timer control
Operation, using a timer, is as follows:
1.
Check that generator
kV
and
mA
settings are correct.
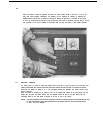
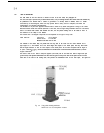
2. Determine the exposure time, and set the timer for the required window shutter. The clear plastic cover is
rotated until the black pointer is
set to the required time
(0
to 6), while the centre knob is rotated in a
clockwise direction until the required multiplication factor (x1,
x10
: seconds, minutes or hours) is against
the arrow.
When timing commences the red pointer will gradually return to zero, then the timer microswitches return
to the normal position (off), the timer and the red pointer returns to the position set by the black
pointer.
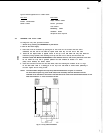
3. Set the three - position SHUTTERS switch to select the required window shutter, e.g. when window 3 is to
be used the right-hand switch is set to 3; and the time must be set by the right-hand timer.
4. Open the shutter by operating the lowest SHUTTERS push-button simultaneously with the required
SHUTTERS I push-button. Whent he shutter is open the X-ray beam passes to the sample in the camera,
the red lamp on the tube shield (below the filter/shutter disc) is lit, the red flags will appear in the holes
on either side of the tube shield, and the timer operation will commence.
5. When the preset time has elapsed the shutter is closed, and the whole instrument is switched off unless a
shutter is open at another tube shield position. X-rays will be generated as long as one or more shutters
are open.
NOTE:
The red warning lamps are fail safe, and the shutters will close if a bulb filament is broken when a
shutter is open.
3.3.2. Without timers
When a timer is not used, or is not fitted, proceed as follows:
1.
Check that the generator
kV
and
mA
settings are correct.
2. Ensure that the 3 - position switches are in the mid-position.
3. Open the shutter by operating the lowest SHUTTERS push-button simultaneously with the required
SHUTTERS I push-button. The shutter will open and the X-ray beam passes to the sample in the camera,
the red lamp on the tube shield is lit, and the red flags will appear in the holes on either side of the tube shield.
4. When the exposure time has elapsed, operate the SHUTTER 0 push-button. The shutter will close,
and the generator will switch off unless a shutter is open at another tube shield position. X-rays will be
generated as long as one or more shutters are open.
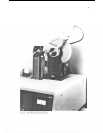
3.4. SWITCHING OFF A MOTOR WHEN THE SHUTTER CLOSES
Cameras can be fitted with motors, either for moving film, or a crystal, or for spinning the sample.
If
required.
the motor operation can be switched off when the timer reaches its zero position,
and it will remain off
until the timer is reset (if one or more shutters are still open). The two outside a.c. mains sockets on the rear
panel are used for this purpose, and it is necessary for a jumper wire to be removed between terminals 25 and
26
on the rear of the timer, refer to the Service Part.
The mains connector for the motor used in the tube shield position 1 or 2, must be plugged into the mains
socket immediately behind, i.e. adjacent to the left-hand side panel. A motor used for positions 3 or 4 will be
connected to the left-hand socket on the rear panel (viewed from the rear).
The procedure for analysis is as described in paragraph
3.3.1.,
but now the camera motor will start at the moment
that the Starting relay operates, when GENERATOR I is depressed.
When the shutter is opened the timer will start, and at the end of the preset time when the shutter closes,
the motor will also stop. If another shutter is still open the equipment will not switch off, the timer is not reset
and there is no power to the motor.
To reset the timer and start the camera motor, place the three-position switch in its central position. If all
shutters are closed after the preset time, the equipment switches off and the timer resets.