


3-1
3. OPERATION
This paragraph describes the method of operating the PW 1720 and the options, such as timers etc., but does
not include operating instructions for accessory devices such as cameras and vertical goniometers.
The initial installation of the PW 1720 is described in the Service part of the manual.
3.1.
INITIAL CHECKS
Before switching on the generator, check the following:
-
Check that HT tank transport fixing screw is removed, see Service installation section.
-
Cooling water for the X-ray tube is turned on.
-
The tube shield is fixed in the required position
(0°,
45°,
or
90°).
-
The X-ray tube installed is suitable for the analysis program.
-
The
kV
and
mA
controls are in minimum position (10
kV
and 5
mA),
also refer to paragraph 3.6.
-
The PW 1161 X-RAYS ON lamp (if fitted) is correctly wired, and is placed in a conspicuous position.
-
The timers (if required) are installed.
-
The accessory units, required for the analysis program, are correctly fitted to the tube shield.
The white push-button must be depressed by the accessory, and the shutter disc is rotated to allow the
X-ray beam to pass.
-
Set the filter disc to the desired position.
-
Check that the a.c. mains stabiliser is correctly installed, when required.
3.2. SAMPLE ANALYSIS
The procedure for analysis will depend on the accessories being used, and the operation of these devices is
described separately in the respective manuals. They should be made ready for analysis by loading the sample,
film (etc.), or positioning the goniometer or other device -see also paragraph 3.4.
l Momentarily operate the GENERATOR I push-button, and when the safety circuit is complete the X-RAYS
ON lamp(s) will light to show that X-rays are being generated. The lamp in the push-button is also lit.
l
Increase the
kV
control to the required value, then adjust the
mA
control until the desired X-ray tube
current is indicated by the meter. Do not exceed the rated maximum power to the X-ray tube, i.e.
the setting of
kV
and
mA
must not exceed the values shown for X-ray tubes in Appendix 1. The ratings
shown in the “X-ray diffraction tubes” leaflet (9499 300 10311) are not applicable.
l
Determine the exposure time, and set the timer if fitted - also refer to paragraph 3.3.
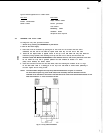
l Place the SHUTTERS three - position switch to select the desired window shutter (with timer), or
infinite time (middle position).
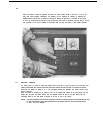
l Open the shutter by simultaneously pressing the lowest SHUTTERS push-button, and the SHUTTERS I
push-button corresponding to the window shutter which is to be opened, refer to figure 3.1. The shutter
will remain open until the timer exposure time has elapsed, or until the SHUTTERS 0 push-button is
operated (when a timer is not fitted or used).
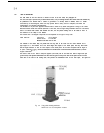
During the time that the shutter is opened, the X-ray beam is allowed into the camera or goniometer, the red
lamps on the tube shield below the shutter/filter disc are lit, and the red flags will appear in the side holes
of the cover over the tube shield mechanism In the event of a failure of one of the lamp bulbs in the
tube shield, the shutter is closed immediately.