


8
ASSEMBLY
NOTE: Illustrations and pictorials begin on
page 2.
Read and follow the assembly and adjustment
instructions for your mower. All fasteners are in
the parts bag (see Figure 15). Do not discard
any parts or material until the unit is assembled.
WARNING: Before doing any
assembly or maintenance to the
mower, remove the wire from the
spark plug.
NOTE: Torque is measured in foot pounds
(metric N.m). This measurement describes
how tight a nut or bolt must be. The torque is
measured with a torque wrench.
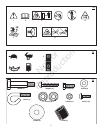
TOOLS REQUIRED
1 Pliers
2 Adjustable open end wrenches
1 Blade type screwdriver
1 Phillips screwdriver
Handle Assembly
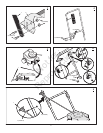
1. (Figure 1) Attach each side of the lower
handle (1) to the mower housing (2)
with bolts (3) and nuts (4).
2. (Figure 2) Assemble the upper handle
to the lower handle with )1( stlob
and nuts (2).
How To Assemble The Controls To The
Handle
NOTE: A cable that is bent or damaged will
not work correctly. Before you use the unit,
replace a damaged cable.
1. (Figure 4) Mount the ends of the engine
stop lever (1) into the bottom set of
holes in the upper handle (2).
2. Attach the engine stop cable (5) to the han-
dle (2).
3. Attach the engine stop cable (5) to the en-
gine stop lever (1).
4. (Figure 3) Attach the engine stop cable (1)
to the engine.
5. Make sure the engine stop cable (1) moves
freely. If the engine stop cable (1) does not
move freely, repeat the above steps.
6. (Figure 4) Attach the engine stop cable (5)
to the handle with the cable fasteners (6).
CAUTION: If a cable fastener is missing, a
cable can
be too near the muffler. Heat
from the muffler can damage the cable.
Before you use the unit, replace a missing
cable fastener.
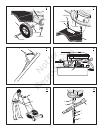
7. (Figure 5) Attach the recoil--start grip (1)
and rope to the right or left side of the handle
with the rope guide (2). Fasten with a lock-
nut (3).
NOTE: If you cannot attach the recoil--start
grip because the rope is too short, hold the
engine stop lever against the handle. Slowly
pull the recoil--start grip.
WARNING: The blade will rotate
when the engine runs.
How To Assemble The Wheels And Axle
Bolts (Figure 6)
1. To change the height of cut, change the posi-
tion of the axle bolts (1) on the mower
housing (2). Make sure you assemble each
axle bolt (1) in the same hole position so
that the mower will cut level.
2. Assemble the wheel (3) to the mower hous-
ing (2) with an axle bolt (1), washer (4),
and flange nut (5). To tighten, turn the axle
bolt (1). Do not turn the flange nut (5).
3. If your model has hub caps (6), push the
hub caps (6) onto the wheels (3) .
Chute Deflector Assembly (Figure 7)
WARNING: The chute deflector is
necessary for your safety and
protection. Do not operate the
mower if the chute deflector is missing or
is not installed correctly.
1. Attach the chute deflector (1) to the mower
housing with a bolt (2), washer (3), and nut
(4). Make sure the fasteners are tight.
How To Prepare The Engine
Note: Engine does not contain OIL or GAS-
OLINE.
WARNING
WARNING: Do not install the engine
stop lever into the top set of holes.
CAUTION: Rotate blade to remove
sharp edges away from work
areas. Use gloves.
: Follow the engine
manufacturer’s instructions for the
type of fuel and oil to use. Always
use a safety fuel container. Do not smoke
when adding gasoline to the engine. When
inside an enclosure, do not fill with gaso-
line. Before you add fuel, stop the engine.
Let the engine cool for several minutes.
NOTE: Actual sustained horsepower will like-
ly be lower due to operating limitations and
environmental factors.
See the engine manufacturer’s instructions for
the type of fuel and oil to use. Before you use
the unit, read the information on safety, opera-
tion, maintenance, and storage.
Final Assembly
Before you use the mower, check the assembly
of the wheels, the handle, and the controls.
Make sure all the fasteners are tight. Make sure
the the engine stop lever works correctly.
OPERATION
NOTE: Illustrations and pictorials begin on
page 2.
Engine Stop Lever (Figure 8)
Release the engine stop lever (1) and the en-
gine and the blade will automatically stop. To run
the engine, hold the engine stop lever (1) in the
Operating position (2)
Before you start the engine, operate the engine
stop lever (1) several times. Make sure the
cable moves easily.
How To Stop The Engine (Figure 8)
To stop the engine, release the engine stop le-
ver (1). Disconnect the wire from the spark plug
to prevent the engine from starting.
If the engine will not stop, hold a screwdriver
against the spark plug and against the engine
cooling fins. The spark will go to ground and the
engine will stop. Before you start the engine,
check the engine stop cable. Make sure the en-
gine stop cable is assembled correctly. Before
you operate the unit, replace a bent or damaged
engine stop cable.
How To Start The Engine (Figure 9 and
Figure 10)
WARNING: The blade will rotate
when the engine runs.
1. Check the oil.
2. Fill the fuel tank with regular unleaded fuel.
See “ How To Prepare The Engine”.
3. Make sure the spark plug wire is connected
to the spark plug.
4. (Figure 9) The primer button (1) is on the
side of the engine. Push the primer button.
Every time you push the primer button (1),
wait two seconds. For the number of times
required to push the primer button, see the
engine manufacturer’s instructions
NOTE: Do not use the primer button to
start a warm engine.
5. (Figure 10) Stand behind the mower. Use
one hand to hold the engine stop lever (1)
in the operating position as shown. Use the
other hand to hold the recoil--start grip (2).
6. Rapidly pull the recoil--start grip (2). Slowly
return the recoil--start grip (2).
7. If the engine does not start in 5 or 6 tries,
See the “Trouble Shooting Chart” Instruc-
tions.
MAINTENANCE
NOTE: Illustrations and pictorials begin on
page 2.
Engine Maintenance
Use the following maintenance section to keep
your unit in good operating condition. All the
maintenance information for the engine is in the
engine manufacturer’s instructions. Before you
start the engine, read this book.
WARNING: Before you make an in-
spection, adjustment (except
carburettor), or repair, disconnect
the wire from the spark plug.
Lubrication
1. For maximum performance, lubricate the
wheels and all pivot points with engine oil
every 25 hours.
2. To lubricate the engine, refer to the engine
manufacturer’s instructions.
NOTE: Do not lubricate the engine stop
cable. Lubricants will damage the cable and
prevent the cable from moving freely. Re-
place the cable if bent or damaged.
How To Clean The Mower Housing
WARNING: The blade will rotate
when the engine runs. Before you
clean the mower housing, stop the
engine and disconnect the wire from the
spark plug.
Grass and other debris can keep the mower
from working correctly. After you mow, clean the
mower housing as follows.
1. Stop the engine.
2. Disconnect the wire from the spark plug.
3. Clean the top and the bottom of the mower
housing.
How To Adjust The Height Of Cut
WARNING: The blade will rotate
when the engine runs. Before you
change the height of cut, discon-
nect the wire to the spark plug.
Models With Axle Bolts (Figure 6)
To change the height of cut, move the axle bolt
(1) at each wheel (2). Make sure you assemble
each axle bolt in the same hole position so that
the mower will cut level.
Not for
Reproduction