


SP1E16A PAVEMENT SAW • OPERATION MANUAL — REV. #0 (04/14/10) — PAGE 21
OPERATION/MAINTENANCE
OPERATION
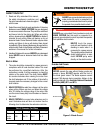
1. To begin sawing, lower the rotating blade allowing it to
cut to the preset depth.
2. When the blade has reached full cutting depth, slowly
walk behind the saw at a rate that will allow the motor
to operate without losing optimum RPM.
3. When the end of the cut has been reached, raise the
blade out of the cut by pulling back on the handlebars
(using a downward pressure) until the raise/lower rod
drops into its slots with the blade in the raised position.
4. If cutting is complete, turn the motor off and wait for
the blade to stop rotating.
STOPPING THE SAW
1. Place the electric motor’s ON/OFF switch in the OFF
position.
2. Disconnect the electric motor’s extension cord from
its power source.
WARNING
ALWAYS keep clear of rotating or moving
parts while operating this equipment.
NOTICE
MAKE CERTAIN to raise the spindle high enough for the
blade to clear the pavement.
WARNING
MAKE CERTAIN the saw path is clear of debris and
obstructions to prevent tripping and/or falling onto the saw,
and to prevent debris from hitting the blade.
CAUTION
DO NOT try to cut faster than the blade will allow.
Cutting too fast will cause the blade to rise up out of
the cut. Improper cutting rate can decrease the life of
the motor and blades.
NOTICE
Mark the cutting line clearly. ONLY saw in a straight line.
MAINTENANCE
Removing or installing blades
Adjusting front or rear pointers
Lubricating any components
Removing motor mounting bolts
Inspecting, adjusting, or replacing drive belt, arbor shaft,
or arbor shaft bearings
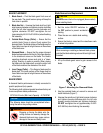
Saw Blade Removal and Installation
See "Blade Removal and Replacement" section in this manual.
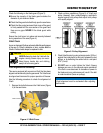
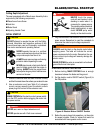
Front Pointer Adjustment
The front pointer wheel has been set at the factory. Use
these procedures only if the pointer is suspect of being
out of alignment.
1. Chalk out a straight line on the prepared slab or cutting
surface.
2. Use a 4 foot straight-edge or level by placing it flat
against the blade.
3. Adjust the front pointer wheel so it just touches the side
of the straight-edge or level.
4. Remove the straight-edge or level.
5. Position the front pointer and blade directly over the
chalk line.
6. Start the saw and lower the blade onto the chalk line.
7. Begin cutting and make sure the blade follows the chalk
line as closely as possible.
8. The pointer should follow the chalk line as well. If it does
not, adjust the pointer by loosening then tightening the
jam nuts on the pointer until the pointer follows the
same path as the blade.
WARNING
ALWAYS ensure that the motor ON/OFF switch is in the
OFF position, the power cable is unplugged, and that the
arbor shaft has COMPLETELY STOPPED ROTATING
before performing any of the following operations:
CAUTION
ALWAYS ensure that unit is unplugged (disconnected)
when installing blade.