


KD1800/KD6 A.C. GENERATOR — PARTS & OPERATION MANUAL — REV. #1 (06/16/05) — PAGE 17
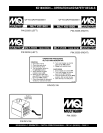
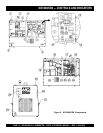
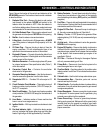
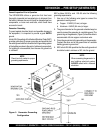
Figure 2 shows the location of the controls and indicators of the
KD1800/KD6 generator. The functions of each control or indicator
is described below:
1. Radiator Filler Port – Remove this plate to add coolant
(anti-freeze) to the radiator. NEVER add coolant to the
radiator when the radiator is HOT!. Allow the radiator to
cool before adding coolant. Use a water coolant mixture as
recommended in the maintenance section of this manual.
2. Air Outlet Exhaust Pipe – Allows engine exhaust to exit
the generator into the open air. NEVER block this opening.
3. Muffler– Used to reduce noise and emissions.
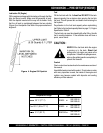
4. Lifting Hook – Use this hook to lift the generator.
ALWAYS
use a lifting device of adequate lifting capacity to lift the
generator.
5. Oil Drain Plug – Remove this plug to drain oil from the
engine crankcase. Fill with recommended type oil as
specified in the maintenance section of this manual.
6. Engine Air Cleaner – Prevents dirt and other debris from
entering the fuel system. Lift locking latch on air filter cannister
to gain access to filter element.
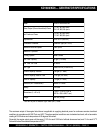
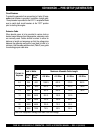
7. Marathon Generator – Provides single-phase AC power
for external equipment. See specification table (Table 1)
within this manual.
8. Generator Output Box – Contains the excitation
electronics for the generator.
9. Generator Mounting Hardware – Use this hardware to
install or remove the generator from the trailer frame.
10. Receptacle G.F.C.I. – Provides 120 volts output at 15
amps.
11. Circuit Protector Circuit Breaker – This single pole circuit
breaker provides circuit protection (120V @15 amps) for
the G.F.C.I receptacle.
12. Main Circuit Breaker – This 2-pole circuit breaker provides
circuit protection (120/240V @30 amps) for the load side of
the generator.
13. Hour Meter – Indicates number of hours machine has
been in use or hours engine was run.
14. Ignition Switch – With key inserted turn clockwise to start
engine.
15. Pre-Heat Indicator Light – Lights blue during engine
start-up. Indicates that engine glow plugs are being pre-
heated. Light will go off after approximately 10 seconds.
KD1800/KD6 — CONTROLS AND INDICATORS
16. Battery Terminals – Connect these terminals to the battery.
Always pay close attention to the polarity of the terminals
when connecting to the battery, RED (positive), and BLACK
(negative).
17. Fuel Filter – Prevents dirt and foreign debris from entering
the fuel system. Replace this filter as recommended in the
maintenance section of this manual.
18. Engine Oil Filler Port – Remove this cap to add engine
oil. Use only recommended type oil. See table 3.
19. Battery – Provides +12 VDC power for the generator. When
replacing battery (12V 40 AH) use only recommended type
battery.
20. Air Inlet vent – Allows outside air to enter the generator.
NEVER block this opening.
21. Engine Oil Dipstick – Remove this dipstick to determine
the level of the oil in the engine crankcase. For safe engine
operation always maintain the oil between the two notches
on the dipstick. Add recommended type engine oil as
specified in Table 4.
22. Oil Filter – Provides oil filtering for the engine. Replace
with only recommended type oil filter.
23. Primer Bulb – Removes air from the fuel system in the
event the engine has run out of gas.
24. Overflow Bottle – Supplies coolant to the radiator when
radiator coolant level is low. Fill to indicated level as shown
on bottle
25. Cabinet Latch – Use this latch to keep cabinet door open.
26. Documentation Box – Operation, parts and service
manuals are kept in this box.
27. Cabinet Handle – Turn handle clockwise to release locking
mechanism, then pull cabinet door upward to gain access
to engine compartment.
28. Output Receptacle – Remove cover plate to gain access
to receptacle. To receive power from the generator, plug
external power cable into this receptacle.
29. Frame Ground Lug – Connect a ground strap between
this lug and a ground rod. Make sure that the ground rod is
inserted deep into the ground to provide a good earth
ground. Consult with local Electrical and Safety Codes for
proper connection.