


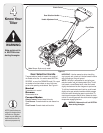

11
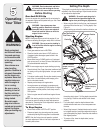
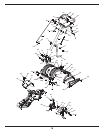
To adjust the depth stake, remove the clevis pin and hairpin
clip. Move the depth stake to the desired setting and
secure with the clevis pin and hairpin clip. See Figure 5-1.
To adjust the side shields, remove the wing nuts. Move
the side shield to the desired position and replace the
wing nuts. Tighten securely.
Operating the Tiller
• Select the depth stake setting.
• Start engine as instructed on the previous page.
• Move gear selection handle to one of the forward
modes or reverse.
WARNING: Do not move the gear selection
handle with the wheels or tines engaged.
Make certain the unit is stopped com-
pletely before changing the gear selection.
A partial engagement may be necessary
when engaging tines.
IMPORTANT: Use the reverse tine drive when tilling
virgin ground, sod, or hard soil. Use the forward tine drive
when cultivating or tilling soft ground.
• Squeeze the clutch handle against the handle to
engage the wheels and tines.
NOTE: Make certain the gear selection indicator is
correctly positioned before engaging the clutch handle. If
it is between gears, the engine will stall.
To transport tiller, do not engage the tines. Select the
wheel drive only.
WARNING: Do not push down on the
handles so that the wheels are lifted off
the ground while using the tine drive, or
the tiller could move backward and cause
personal injury.
For best results, it is recommended the garden be tilled
twice (lengthwise, then width-wise) to pulverize the soil.
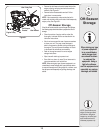
Making Adjustments
WARNING: Never attempt to make any
adjustments while the engine is running,
except where specified in operator’s
manual.
Handle Adjustment
The handle height may be adjusted to the desired height.
Refer to the handle adjustment in Know Your Tiller
section.
6
Making
Adjustments
WARNING
Do not move the gear
selection handle
with the wheels or
tines engaged. Make
certain the unit is
stopped completely
before changing the
gear selection. A
partial engagement
may be necessary
when engaging tines.
Do not push down
on the handles so
that the wheels are
lifted off the ground
while using the tine
drive, or the tiller
could move backward
and cause personal
injury.
Never attempt to
make any adjust-
ments while the
engine is running,
except where speci-
fied in operator’s
manual.
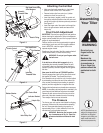
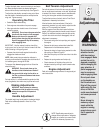
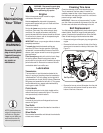
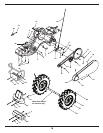
Belt Tension Adjustment
Periodic adjustment of the belt tension may be required
due to normal stretch and wear on the belt. Adjustment
is needed if the tines or wheels seem to hesitate while
turning, but the engine maintains the same speed.
To adjust the tension on the belt, refer to Final Clutch
Adjustment in Assembly Instructions.
After belt tension has been adjusted, if the belt is
excessively stretched, you may need to adjust the idler
pulley rod. This can easily be checked.
With the engine off and the clutch control bail disen-
gaged, shift the gear selection handle to each forward
mode. If the indicator bracket touches the idler pulley
rod (with the clutch control bail disengaged), then an
adjustment is necessary.
• Disconnect and ground out spark plug wire against
the engine.
• Remove the belt cover as described under Belt
Replacement in the Maintenance section.
• Remove the hairpin clip and spring washer from the
idler pulley rod. Refer to Figure 9.
• Move the idler pulley rod to the lower hole in the idler
bracket.
• Replace the spring washer and hairpin clip.
• Check clearance of the idler pulley rod to the
indicator bracket by shifting to each forward mode,
as before.
Engine Adjustment
Refer to the separate engine manual for engine adjust-
ment instructions.
NOTE: Specifications are subject to
change without notification or obligation.
Images my not reflect your exact model
and are for reference purposes only.