


7
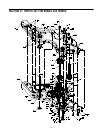
Figure 3
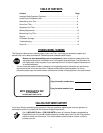
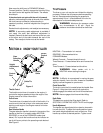
Attaching The Clutch Cable
Attach the clutch cable to the handle as follows (be
careful not to kink the cable).
• Remove threaded eyebolt and nut from the end of
the cable.
• Route the clutch cable to the right side of the
handle mounting brackets and underneath the
handle.
• Push the cable through the hole in the center of the
handle and snap in the plastic fitting. See Figure 3.
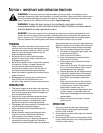
• Remove slot head screw, nut and two flat washers
from the clutch bail.
• Fasten the threaded eyebolt onto bail as shown in
Figure 4. The parts go together from top to bottom
as follows: Slot Head Screw, Flat Washer, Clip,
Eyebolt, Flat Washer and 1/4” Nut.
• Thread eyebolt and #10 nut, removed in step 1, into
the internally threaded tube at the end of the cable.
Thread engagement should be about 3/4”. Tighten
nut against tube at end of cable. See Figure 4.
Figure 4
NOTE: Do not overtighten clutch cable. Too much
tension may cause it to break.
WARNING: Be certain to check the clutch
cable adjustment as instructed on this page
before operating the tiller.
Secure clutch cable to handle using cable tie. Refer to
Figure 6. Cut off excess end of cable tie.
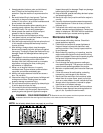
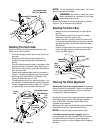
Attaching The Control Rod
• Make sure the handle assembly is in the highest
position.
• Remove hairpin clips from control rod, (rubber
washers to remain on control rod).
• Insert the shorter, (angled), end of the control rod
through the indicator bracket on the shift cover and
secure with hairpin clip that was removed in step 1.
See Figure 5.
• Insert the longer end of the control rod through the
hole in the gear selector handle and secure with
hairpin clip.See Figure 6.
.
Figure 5
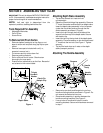
Checking The Clutch Adjustment
IMPORTANT:
Service the engine with oil and gasoline
before checking this adjustment. Refer to the separate
engine manual packed with your tiller for proper fuel
and engine oil recommendations.
Position the tiller so the front counterweight is against a
solid object, such as a wall. With the gear selection
lever in NEUTRAL, start the engine. Refer to the
separate engine manual.
Standing on the right side of the tiller, examine the belt
(inside the belt cover). It should not be turning.
NOTE: Do not put fingers under the belt cover.
If the belt turns without bail engaged, adjust by
unthreading the internally threaded tube at the end of
the cable a few turns clockwise (when standing in
operator’s position), and then retighten the nut against
the tube.
Plastic Fitting
Internally Threaded
Tube
Slot Head Screw,
Nut, Flat Washers
Slot Head Screw
Flat Washers
Threaded
Eyebolt
Internally
Threaded
Tube
Clutch
Bail
3
/
4
”
1/4”
Nut
#10
Nut
Indicator Bracket
Rubber
Washer
Control Rod
Hairpin
Clip
Idler
Pulley
Rod