


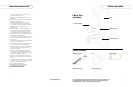

Trap Assembly:
7
For accessories and additional info contact your local dealer/distributor.
Dealer contact info can be found at: www.mosquitomagnet.com/dealers
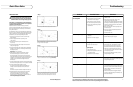
Charging your Mosquito Magnet
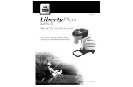
®
Liberty Plus
1 . Remove cover panel from rear of Head Unit (panel snaps off).
2
. Insert and connect re-chargeable battery.
3
. Insert Charging Adapter into rear of Head Unit.
Allow to charge for 24 hours at the
beginning of each
sea
son. You will not need to charge again until next season.
Replace cover panel whencompleted (panel snaps into place)
.
N O T E
: Unit must be charged indoors, trap is not
weathe
rproof with cover panel removed.
Attractant Installation:
See Mosquito Magnet
®
attractant label for installation,
use, storage and disposal inst
ructions.
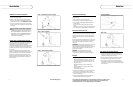
Trap Placement
1 . Determine the direction of the prevailing wind.
Check local weather
patterns if you are unsure
2
. Stand in the center of the area you are trying to protect
and loo
k toward the prevailing wind.
3. Proper placement of
the Liberty Plus will be 9m – 12m in
front of you, within 1.5m – 2m of ground cover (i.e., bushes,
flowerbeds, tree line, marshbed). Ensure that trap is not
direc
tly against any blockades such as buildings, fences, etc.
4
. It is recommended that the trap be placed in the shade.
5
. Do not place trap directly above a water source
(sprinklers, hose, etc.).
7
. Trap must be placed onlevel ground to avoid tipping
or
uneven propane distribution.
8
. For more information, refer to trap placement CD-ROM
included with your Liber
ty Plus.
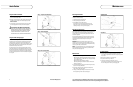
Installation
6
American Biophysics
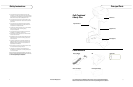
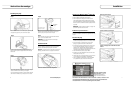
Assembly Instructions
Step 1
Step 2
Step 3
Net locks into front of compartment
Step 4
See Attractant Package for details.
H o r n
Remove Back Panel
Insert & Connect Battery
Plug Charger Into Battery Charging Powerhead
For o
ptimal trap placement
in your yard, refer to trap
placementCD
-ROM includedwith
your Liber
ty Plus.
Step 5
Charge Liberty Plus for 24 hours before use.
See pg. 7 for fur
ther details.
NOTE:
You will not need to charge it again until the
foll
owing season.
Net Installation:
Lift clear plastic lid and lock plastic holding bracket of net into
front of compar
tment. Close plastic lid when finished.
N o t e
: Fabric loops hook over plastic posts allowing net
to expand to it highest capa
city.
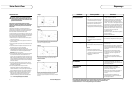
Place base upside down on a flat sur
face, unfold U-shaped
suppor
t leg until it locks in place.
Insert the Plume Tube into hor
n and turn until Tube locks
into place.
Place Liberty
Plus power head onto pole. Press down firmly
with t
wo hands to secure.
Assembled trap should have t
he front of power head
in t
he same direction as base U-shaped legs.
Turn base and leg assembly right-side-up and place support
pole into cavity on base.