


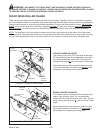


the remainder of the load. If both sides do shear in
-
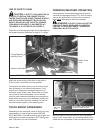
stall only one set of auger shear bolts and unload one
side at a time. After first side is unloaded install bolts
in opposite side and unload the remainder of the
spreader. If a second shear has happened without ob
-
struction in the auger, install the next larger size shear
bolt. As the shear bolt size is increased the protection
on the machine is going to decrease. The potential for
equipment damage is greater.
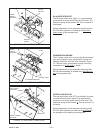
Order replacement bolts and nuts from the chart be
-
low.
Part #
Description
831-5020-1.75 ½-20x1-3/4” Allen Head Cap Bolt
884-5020 ½-20 Top Locknut Grade 8
831-5618-1.75 9/16-18x1-3/4” Allen Head Cap Bolt
884-5618 9/16-18 Top Locknut Grade 8
910-0101 120B33 Shear Sprocket Assembly
Complete
STORAGE AFTER USE
WARNING: DISCONNECT PTO DRIVE
SHAFT AND HYDRAULIC HOSES BEFORE
CLEANING, ADJUSTING, OR SERVICING THIS
MACHINE. FAILURE TO HEED MAY RESULT IN
SERIOUS PERSONAL INJURY OR DEATH.
Before storing this spreader for an extended period of
time perform the following:
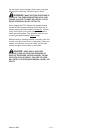
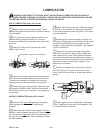
Allow the spreader to completely clean out the last
load. Thoroughly hose off all manure from the outside
of the spreader and the inside of the box, particularly
getting the flow control rear gate mechanism clean.
The wash water can be drained into your manure stor
-
age pit, or if the gate is left closed, the water can be
spread on the field. After cleaning, completely lubri
-
cate the entire spreader to exclude moisture from
bearings and to prevent condensation from forming
during storage. See “Lubrication” pages 20 and 21.
Apply oil to roller chain drives. It is also a good time to
inspect all adjustments and check for parts that need
repair or replacement. Performing these tasks now will
guarantee that the spreader is ready for use at the be-
ginning of the next season.
Model V-Max —14—