


7
1% Vie
wfinder Bracket Screws:
Tighten to a fir
m feel to hold viewfinder securely in
place (
see E and h). See page 12 for more information.
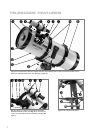
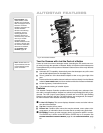
1^ Focus Lock Knob: Designed to prevent the focuser drawtube from moving when
a heavy accessory, such as a camera, is attached to the focuser assembly. For
nor
mal observing with an eyepiece and diagonal, it is not necessary to use the
loc
k knob.
1& Declination (Dec.): Controls the manual movement of the telescope. Turning the
Dec. lock counterclockwise unlocks the telescope enabling it to be freely rotated
by hand about the Dec. axis. Turning the Dec. lock clockwise (to a firm feel only)
tightens the lock and prevents the telescope from being moved manually, but
engages the Dec. motor drive (see
3$) for Autostar operation.
1* Polar Viewfinder Cap: Remove this cap when using the polar viewfinder (see 2().
1( Dec. Setting Circle: See APPENDIX A, page 50, for more information.
2) Counterweight Shaft Base: Thread, along with the shaft, to the mount. See
page 11 for more information.
2! Counterweight and Counterweight Lock Knob: Counterbalances the weight of
the optical tube, and adds stability to the mount.Tighten the lock knob on the side
of the counterweight to a firm feel to prevent the weight from sliding on the shaft.
2@ Counterweight Shaft: Slide the counterweight onto this shaft (see 2!).
2# Counterweight Safety Cap: Prevents the counterweight from accidentally slip-
ping off the end of the counterweight shaft.
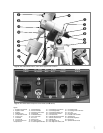
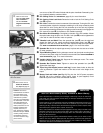
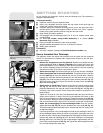
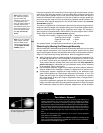
2$ Computer Control Panel (see Fig. 1e):
A. Handbox (HBX) Port
: Plug the Autostar or EC handbox coil cord (10,
Fig. 2
) into this port.
B. 12v DC Power Connector: Plug the battery pack into this connector.
The telescope assembly also may be powered from either a 12v DC
auto cigarette lighter plug using the optional #607 Cigarette Lighter
Adapter or from a standard 115v AC home outlet using the optional
#547 Power Adapter with Cable or #547F Power Adapter for 220v out-
lets. See
OPTIONAL ACCESSORIES, page 38.
C. LED: Illuminates when power is supplied to the Autostar or EC hand-
box and the telescope’s motor drive.
D. ON/OFF Switch: Turns the Computer Control Panel and Autostar ON
or OFF.
E. AUX Port:
Provides connection for current and future Meade accessories.
See
OPTIONAL
A
CCESSORIES
, page 38.
F. Dec Port:
Plug the coil cord from the Dec. motor assembly into this port
for Autostar to control the motor drive.
2% Right Ascension (R.A.) Motor Drive Assemb
l
y:
Controlled b
y A
utostar or EC
handbox. Moves the optical tube along the R.A. axis.The R.A. Lock (see
3#) must
be tightened to a firm feel in order for the R.A. motor to operate.
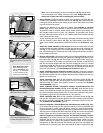
2^ Latitude Adjustment T-Handles (2): Sets the latitude of your observing location.
The two T-handle screws work in a "push - pull" operation—as you tighten one,
loosen the other.
2& Fine Azim
uth Contr
ol Knobs
:
Fine tune the side-to-side mo
v
ement of the tele
-
scope when centering Polaris in the telescope eyepiece or when using the polar
alignment viewfinder (see
2().
2* Latitude Dial:
Set the latitude of the obser
ving site on this dial using the latitude
T-handle screws. For more information see Step 6, page 12.
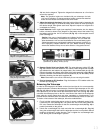
2( P
olar Alignment
Vie
wfinder:
Allo
ws y
ou to precisely polar align the telescope
.
Useful when perf
orming astrophotography. See page 52.
3) P
olar Alignment
Vie
wfinder Retic
le and LED Knob:
Rotate the knob to s
witch
on or off the LED that illuminates the reticle within the polar alignment finder
.Be
Caution When loosening
the Dec. lock, be sure to
support the optical tube
(18, Fig. 1a). The weight of
the tube could cause the
tube to swing suddenly.
2* W
ant to lear
n more
about
setting the lati-
tude dials
?