


42
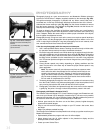
4. Perform an actual star test to confirm the accuracy of steps 1 through 3. Using the
SP 26mm eyepiece, point the telescope at a moderately bright (second or third mag-
nitude) star, and center the image in the main telescope's field of view.
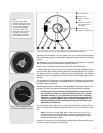
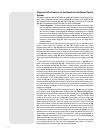
5. Bring the star's image slowly in and out of focus until you see several disks sur-
rounding the star's center. If steps 1 through 3 were done correctly, you will see con-
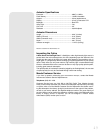
centric (centered with respect to each other) circles (
1, Fig. 32).
An improperly collimated instrument will reveal oblong or elongated circles (2, Fig.
32). Adjust the 3 collimating screws on the primary mirror housing until the circles
are concentric on either side of the focus.
In summary, the 4 adjustment screws on the plastic diagonal mirror housing change
the tilt of the secondary mirror so that it is correctly centered in the focuser draw-
tube, and so that the primary mirror appears centered when looking into the focuser.
The 3 collimating knobs on the primary mirror change the tilt of the primary mirror
so that it reflects the light directly up the center of the drawtube.
Alignment (Collimation) of the Schmidt-Cassegrain Optical
System
The optical collimation (alignment) of any astronomical telescope used for serious
purposes is important, but in the case of the Schmidt-Cassegrain design of the model
SC-8, such collimation is absolutely essential for good performance. Take special care
to read and understand this section well so that your model SC-8 will give you the best
optical performance.
As part of final optical testing, every Meade Schmidt-Cassegrain is precisely colli-
mated at the Meade factory before shipment. However, vibrations in shipping can
cause the optical system to become misaligned. Re-aligning the optics is, however, a
straightforward process.
T
o check the collimation of your
SC-8, center a br
ight star that is overhead, or use a
“hot spot” of reflected Sunlight from a chrome car bumper, with the supplied 26mm
e
y
epiece
.
Allo
w the telescope to adjust to the temper
ature of y
our observation site
bef
ore proceeding;
temper
ature diff
erences betw
een the optics and the outside air
can cause distor
tion in the images.
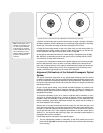
With the star or hot spot centered, de-f
ocus the image
.
Y
ou will notice that the out of
f
ocus star image looks lik
e a r
ing of light surrounding a dar
k central spot; the dark cen-
tral spot is in fact the shadow of the secondary mirror. Turn the focus knob until the
ring of light fills about 10% of the eyepiece field-diameter. If the dark central spot is
offset in (
i.e
.,
not concentr
ic with) the r
ing of light, y
our telescope’
s optical system is
misaligned and requires collimation.
Follow these steps for collimation of the optical system:
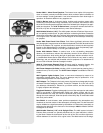
a. The only adjustments possible, or necessary, on the SC-8 models are from the
three screws (
Fig. 33b) located at the edge of the outer surface of the secondary
mirror housing.
Fig. 32: Correct (1) and incorrect (2) collimation as viewed during a star test.
b
c
Note: A small paper ring is
attached to the primary mir-
ror. This ring was attached
at the factory for purposes
of laser collimation. The ring
will not diminish your tele-
scope's imaging capabilities
and does not need to be
removed.