


8
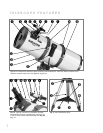
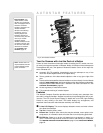
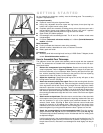
2( Polar Alignment Viewfinder: Allows you to precisely polar align the telescope.
Useful when performing astrophotography. See page 50.
3) Polar Alignment Viewfinder Reticle and LED Knob: Rotate the knob to switch
on or off the LED that illuminates the reticle within the polar alignment finder. Be
sure to turn off the LED when finished with the polar viewfinder. Powered by (fac-
tory-supplied) batteries contained within.
3! Right Ascension (R.A.) Setting Circle: See APPENDIX A, page 48, for more
information.
3@ R.A. Setting Circle Lock Knob: Rotate the knob to lock the R.A. Setting Circle
(see
3!) in place.
3# R.A. Lock: Controls the manual movement of the telescope. Turning the R.A.
lock counterclockwise unlocks the telescope enabling it to be freely rotated by
hand about the R.A. axis. Turning the R.A. lock clockwise (to a firm feel only)
tightens the lock and prevents the telescope from being moved manually, but
engages the R.A. motor drive (see
2%) for Autostar or EC handbox operation.
3$ Dec. Motor Drive Assembly: Controlled by Autostar or the EC handbox. Moves
the optical tube along the Dec. axis. The Dec. Lock (see
1&) must be tightened to
a firm feel in order for the Dec. motor to operate.
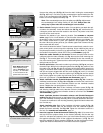
3% Tripod Leg Adjustment Knobs (3): Tighten to a firm feel to secure tripod legs.
3^ Variable Height Tripod Legs (3): Supports the telescope mount. Note that one
legs has a star stamped on top of it. This leg must be pointed North (South in the
Southern hemisphere) during the alignment procedure. The mount attaches to
the top of the tripod.
3& Accessory tray: Set extra eyepieces and other accessory on this convenient
tray.
3* Tripod Leg Braces (3): Make the tripod more secure and stable. See Fig. 3.
3( Accessory Tray Thumbscrew: Attach on the top side of the tray and tighten to a
firm feel to secure the tray to the tripod and keep the tripod stable. See
HOW TO
ASSEMBLE YOUR TELESCOPE, page 11 for more information.
4) Tripod Leg Lock Knobs (one on each leg): Loosen these knobs to slide the
inner leg extension. Tighten the knobs to a firm feel to lock in the height of the tri-
pod.
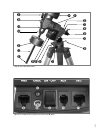
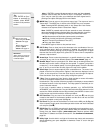
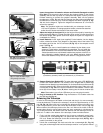
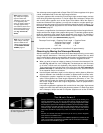
4! Battery Pack and holder (see Fig. 1f): Plug into the 12v DC power connector
(B, Fig. 1e) of the computer control panel. Insert 8 (user-supplied) D-cell batter-
ies to power motor drives and Autostar handbox.
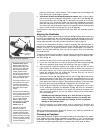
Join an Astronomy Club, Attend a Star Party
One of the best ways to increase your knowledge of astronomy is to join an astronomy
club. Check your local newspaper, school, library, or telescope dealer/store to find out if
there’s a club in your area.
At club meetings, you will meet other astronomy and Meade enthusiasts with whom you
will be able to share your discoveries. Clubs are an excellent way to learn more about
observing the sky, to find out where the best observing sites are, and to compare notes
about telescopes, eyepieces, filters, tripods, and so forth.
Often, club members are excellent astrophotographers. Not only will you be able to see
examples of their art, but you may even be able to pick up some “tricks of the trade” to
try out on your
LXD55-Series telescope. See page 36 for more information about pho-
tography with the
LXD55-Series.
Many groups also hold regularly scheduled Star Parties at which you can check out and
observe with many different telescopes and other pieces of astronomical equipment.
Magazines such as Sky & Telescope and Astronomy print schedules for many popular
Star Parties around the United States and Canada.
LXD55 TIPS
Fig. 1f: The LXD55-Series Battery
Pack and holder.
4!
Caution: Use care to
install batteries as indicat-
ed by the battery com-
partment. Follow battery
manufacturer's precau-
tions. Do not install batter-
ies backwards or mix new
and used batteries. Do
not mix battery types. If
these precautions are not
followed, batteries may
explode, catch fire, or
leak. Improperly installed
batteries void your Meade
warranty. Always remove
the batteries if they are
not to be used for a long
period of time.
2( Want to learn more
about the polar align-
ment viewfinder?
See the The Polar
Alignment Viewfinder,
page 50.
4! Want to learn how to
install the batteries?
See step 12, page 13.