


30
Two-Star Alt/Az Alignment
T
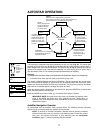
wo-Star Alignment requires some knowledge of the night sky.AutoStar provides a database of
bright stars and two stars from this database are chosen by the observer for alignment.
1. Perform steps 1 through 8 as described in the EASY ALIGNMENT PROCEDURE, page 19.
2
. Align to the first star. AutoStar then displays a database of stars for the observer to
choose from. Use the Scroll keys to scroll to a star that you wish to align upon. Select a
star that you can easily locate in the night sky.
3.
Press ENTER.
The telescope slews to the star for alignment. Use the Arrow keys to move
the telescope until the star is visible and centered in the eyepiece.
4.
Press ENTER. Repeat procedure for the second alignment star. The telescope is aligned
and you are now ready to use AutoStar's GO TO capabilities for a night of observing.
One-Star Alt/Az Alignment
One-Star Alignment requires some knowledge of the night sky. AutoStar provides a database
of bright stars. One-Star Alignment is identical to Two-Star Alt/Az: Alignment (see TWO-STAR
ALT/AZ ALIGNMENT, above), except only one star from this database is chosen by the observ-
er for alignment.
IMPORTANT NOTE: The accuracy of One-Star Alt/Az Alignment, unlike the Two-
Star Alt/Az Alignment procedure, depends on how well the observer levels the tel-
escope and how close to North the telescope is pointed when setting the Home
Position (
Fig. 24). Because Two-Star Alignment uses two stars to align upon, it is
more precise than One-Star Alignment.
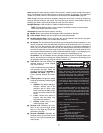
Observing a Satellite
NOTE: Satellite observing is an exciting challenge. Most satellites are in low orbit,
traveling at approximately 17,500 mph. They move quickly across the sky and are
visible only for a few minutes, requiring AutoStar to slew the telescope rapidly. Best
viewing is near Sunrise or Sunset when the sky is still dark. Viewing in the middle
of the night can be problematic because the satellite may pass overhead, but not
be visible as it is in the Earth's shadow.
1. Choose a satellite from the Select menu, then press ENTER. AutoStar scans its database
to find if that satellite is expected to pass overhead within the next 6 hours.
2. If a satellite is expected, use the Scroll keys to access a list of information about the pass,
including acquisition time, location,
etc.
3. At the end of the list is “Alarm.” Press ENTER and AutoStar automatically sets the alarm
to sound several minutes before the scheduled appearance. You may return to regular
observations until the alarm goes off.
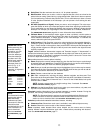
4. When the alarm goes off, return to the Satellite menu and press a Scroll key until the
desired satellite is on the top line of the display.
5. Press GO TO.AutoStar slews the telescope to where the satellite should appear.The motor
dr
iv
e stops and a countdo
wn star
ts
.
NO
TE:
If the scheduled appear
ance position of the satellite is obstr
ucted (i.e
., b
y a
building, tree, or hill), press ENTER and AutoStar starts to move the telescope
along the expected satellite track. When the track clears the obstruction, press
ENTER again to pause the telescope
, then contin
ue with this procedure.
6.
With about 20 seconds left on the countdo
wn timer
, start watching through the eyepiece
for the satellite to enter the field of view.
7. When the satellite enters the field of view, press ENTER.The telescope starts to track with
the satellite.