


15
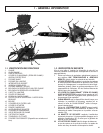
7 - MAINTENANCE INSTRUCTIONS
7-2. AIR FILTER
CAUTION
Never operate saw without the air filter. Dust and dirt will
be drawn into engine and damage it. Keep the air filter
clean!
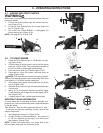
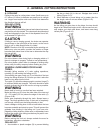
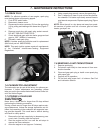
TO CLEAN AIR FILTER:
1. Remove the air cleaner cover (A) by loosening the
cover retaining screw. Cover will lift off.(Figure 7-2A)
2. Completely remove the air filter box (B) from the unit.
(Figure 7-2B)
3. Clean air filter box by using pressurized air or brush.
NOTE: Never clean air filter with liquid material or it may
cause air filter damaged.
4. Install air filter box. Install air filter cover. Make sure
cover fits properly. Tighten the cover retaining screw
securely.
WARNING
Never perform maintenance when the engine is hot, to
avoid any chance of burning hands or fingers.
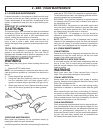
7-3.FUEL FILTER
CAUTION
Never operate your saw without a fuel filter. The fuel filter
should be replaced after each 20 hours of use. Drain fuel
tank completely before changing filter.
1. Completely remove the fuel cap from the gas tank.
2. Bend a piece of soft wire to form a hook at the end.
3. Reach into fuel tank opening and hook fuel line.
Carefully pull the fuel line toward the opening until you
can reach it with your fingers.
NOTE: Do not pull hose completely out of tank.
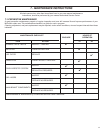
4. Lift filter (A) out of tank (Figure 7-3A).
5. Pull filter off with a twisting motion. Discard filter.
6. Install new filter. Insert end of filter into tank opening.
Make sure filter sits in bottom corner of tank. Use a
long handle screwdriver to aid in filter placement if
necessary.
7. Fill tank with fresh fuel / oil mixture. See Section 4,
Fuel and Lubrication. Install fuel cap.
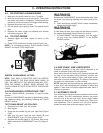
7-4. SPARK ARRESTER SCREEN (Figure 7-
4A)
NOTE: A clogged spark arrester screen will dramatically
reduce engine performance.
1. Remove the 2 nuts (A) and pull muffler out. (Figure7-
4A).
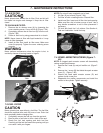
2. Remove the 1 screw (B) that holds the spark arrester
cover (C) . (Figure 7-4B)
3. Discard the used spark arrester screen (D) and
replace it with a new one.
4. Reasemble the muffler components and install the
muffler to the cylinder. Tighten securely.
7-2A
A
7-2B
B
7-3A
A
7-4A
A
B
7-4B
A
B
C
D