


13
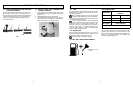
7-1. MAINTENANCE SCHEDULE
Perform these required maintenance procedures at the fre-
quency stated in the table. These procedures should also
be a part of any seasonal tune-up.
NOTE: Maintenance, replacement, or repair of the emis-
sion control devices and system may only be performed by
McCulloch service dealer.
WARNING
To prevent serious injury, never perform maintenance or
repairs with unit running. Always service and repair a cool
unit. Disconnect the spark plug wire to ensure that the unit
cannot start.
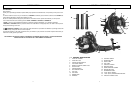
7 - MAINTENANCE INSTRUCTIONS
12
6 - OPERATING INSTRUCTIONS
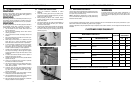
A good preventive maintenance program of regular inspection and care will increase life and improve performance of your
blower. This maintenance checklist is a guide for such a program.
Cleaning, adjustment, and part replacement may be required, under certain conditions, at more frequent intervals than those
indicated.
CUSTOMER RESPONSIBILITY
MAINTENANCE CHECKLIST
EACH USE
HOURS OF
OPERATION
ITEM BEFORE EACH USE 10 20
SCREW / NUTS / BOLTS INSPECT / TIGHTEN
✔
AIR FILTER CLEAN OR REPLACE
✔
FUEL FILTER REPLACE
✔
SPARK PLUG CLEAN / ADJUST / REPLACE
✔
SPARK ARRESTER SCREEN
INSPECT
✔
REPLACE
✔
FUEL HOUSES
INSPECT
✔
REPLACE AS REQUIRED
✔
VACUUM TUBES INSPECT / CLEAN
✔
*Recommended for Maintenance by a Authorized Service Center Technician.
6-1. BLOWER OPERATIONS
WARNING
Because of flying debris, always wear American National
Standards Institute approved shielded safety glasses or
face shield when operating blower.
WARNING
Before using your blower, review Safety Precautions in your
User Manual, and all regulations for operation of the unit.
These precautions and regulations are for your protection.
WARNING
DO NOT operate the blower with other people or animals in
the immediate vicinity. Allow a minimum of 50 feet (15
meters) between operator and other people or animals.
1. Use the blower for trees, shrubs, flower beds, and
hard-to-clean areas.
2. Use the unit around buildings and for other normal
cleaning procedures.
3. Use the blower around walls, overhangs, fences, and
screens.
4. We recommend that a face mask be worn when oper-
ating blower in dusty areas.
5. Stand away from the debris, at a distance that will
easily allow you to control the direction of blown
debris. Never blow debris in direction of bystanders.
6. To control velocity of airstream, blower can be operat-
ed at any speed between idle and full throttle.
Experience with the unit will help you determine the
amount of airflow necessary for each application.
7. Operate power equipment only at reasonable hours--
not early in the morning or late at night when people
might be disturbed. Comply with times listed in local
ordinances.
8. To reduce sound levels, limit the number of pieces of
equipment used at any one time.
9. Operate power blowers at the lowest possible throttle
speed to do the job.
10. Check your equipment before operation, especially
the muffler, air intakes and air filters.
11. Use rakes and brooms to loosen debris before blow-
ing.In dusty conditions, slightly dampen surfaces
when water is available.
12. Conserve water by using power blowers instead of
hoses for many lawn and garden applications, includ-
ing areas such as gutters, screens, patios, grills,
porches and gardens.
13. Watch out for children, pets, open windows or freshly
washed cars, and blow debris safely away.
14. Use intermediate tube plus nozzle of your choice so
the airstream can work close to the ground.
15. After using blowers and other equipment, CLEAN UP!
Dispose of debris in trash receptacles.
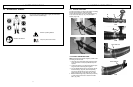
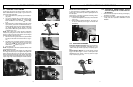
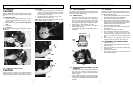
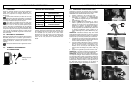
6-2. OPERATION INSTRUCTIONS
1. Follow the instructions “STARTING A COLD
ENGINE”.
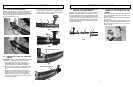
2. Once unit is running, place unit on your back by slip-
ping arms through the shoulder straps as if your were
putting on a jacket (Fig. 6-2A).
3. When preparing to clear an area of debris, always
position yourself so that you can control the direction
debris will be blown .
4. The control handle (A, Fig. 6-2B) and the flexibility of
the blower tube assembly will allow you to clear the
most hard-to-reach areas .
5. The hand grip, throttle trigger, throttle lock and ignition
on/off switch (B) are all mounted on a swivel handle
that offers a wide range of operating positions and
comfort (Fig. 6-2C).
6-2A
6-2B
5-5C