


9
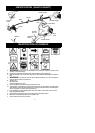
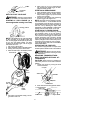
ON/STOP
Switch
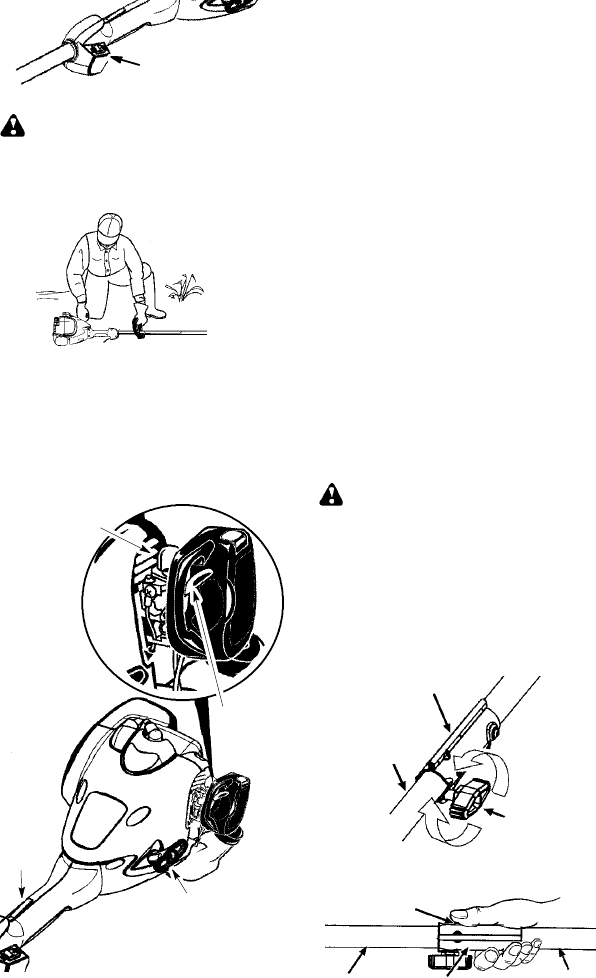
HOW TO S TART YOUR UNIT
WARNING: A void any contact with the
muffler . A hot muffler can cause serious burns.
STARTING A COLD ENGINE (or a
war m engine af ter runni ng out of fuel)
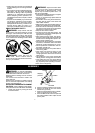
Starting position
NOTE: Thethrottle l ock--outmustbeengaged
to allow operation of the throttle trigger. The
lock--out is engaged with the palmof your hand
as you grip the throttle handle. DO NOT
squeeze the throttle trigger until the engine
has started and runs.
1. Set unit on a flat surface.
2. Move ON/ST OP switch to the ON position.
3. Slowly press t he primer bulb 6 times.
4. Move the start lever t o the ST ART p osition.
Throttle
lock--out
Primer Bulb
Start
Lever
Starter
Handle
5. Pull starter rope handle sharply until en-
gine starts and runs.
6. Allow unit to run for 10--15 seconds, then
fully squeeze the throttle trigger to disen-
gage the starting system.
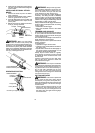
STARTING A WARM ENGINE
1. Move ON/STOP switch to the ON position.
2. Squeeze and hold the throttle trigger .
Keep throttle trigger fully squeezed until
engine runs smoothly.
3. Pull starter rope sharply while squeezing
throttle trigger until engine runs.
NOTE:Normally,thewarm starting procedure
can be used within 5 -- 10 minutes after the unit
is turned ST OP. If t he uni t sits for more tha n 10
minutes withoutbeing run,itwillbenecessaryto
start the unit by following the steps under
STARTINGACOLDENGINEorfollowingthe
starting instruction steps shown on the unit.
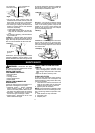
STARTING A FLOODED ENGINE
Flooded engines can be started by placing
the ON/STOP switch in the ON position.
Move the start lever to the RUN position and
fully squeeze throttle trigger. Pull the starter
handle repeatedly while squeezing throttle
triggeruntilenginestartsandruns.This could
require pullingthestarterhandle manytimes,
depending on how badly the unit is flooded.
If the unit still doesn’t start, refer to TROUBLE-
SHOOTING TABLE.
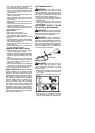
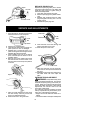
OPERATING THE COUPLER
This model is equipped with a coupler which
enables optional attachments to be installed.
WARNING: Alwaysstopunitanddis-
connectsparkplug beforeremovingorinstal-
ling attachments.
REMOVING TRIMMER ATTACH-
MENT (OR OTHER OPTIONAL AT -
TACHMENTS)
CAUTION:
When removingor installingat-
tachments, placethe uniton aflat surfacefor
stability.
1. Loosen the coupler by turning the knob
counterclockwise.
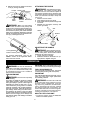
Attachment
Coupler
Knob
LOOSEN
TIGHTEN
2. Press and hold the locking/release button.
Locking/Release
Button
Coupler
Upper Shaft
Attachment