


11
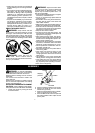
Tip of the Line
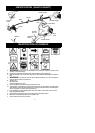
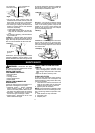
Does TheCutting
Right Wrong
Line Crowded Into
Work Area
S The line will easily remove grass and
weedsfromaroundwalls,fences,treesand
flower beds, but it also can cut the tender
bark of trees or shrubs and scar fences.
S For trimming or scalping, use less than full
throttle to increase line life and decrease
head wear , especially:
S During light duty cutting.
S Near objects around which the line can-
wrap such as small posts, trees or fence
wire .
S Formowingorsweeping,usefullthrottlefor
a good clean job.
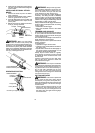
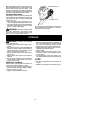
TRIMMING -- Hold the bottom of the trimm er
head about 8 cm above the ground and at an
angle. Allow only the tipof the lineto make con-
tact. Do not force trimmer line into work area.
Trimming
8 cm above
ground
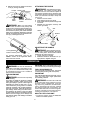
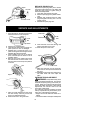
SCALPING--Thescalpingtechniqueremoves
unwanted vegetation. Hold the bottom of the
trimmer headabout 8cm above thegroundand
at an angle. Allow the tip of t he line to strike the
ground around trees, posts, monuments, etc.
This technique increases line wear .
Scalping
MOWING -- Your trimm er is idea l for mowing
in places conventional lawn mowers cannot
reach. In the m owing position, keep the line
parallel to the ground. Avoid pressing the
head into the ground as this can scalp the
ground and damage the tool.
Mowing
SWEEPING --Thefanning actionoftherotat-
ing line can be used for a quick and easy
clean up. Keep the line parallel to andabove
the surfaces being swept and move the tool
from side to side.
Sweeping
MAINTENANCE
WARNING: Disconnect the spark
plug before performing maintenance except
for carburetor adjustments.
CHECK FOR LOOSE
FASTENERS AND PARTS
S Spark Plug Boot
S Air Filter
S Housing Screws
S Assist Handle Screw
S Debris Shield
CHECK FOR DAMAGED OR
WORN PARTS
Contact an aut ho rized service dealer fo r re-
placement of damaged or worn parts.
S ON/STOP Switch -- Ensure ON/STOP
switch functions properly by moving the
switch to the STOP position. Make sure en-
gine stops; then restart engine and continue.
S Fuel Tank -- Discontinue use of unit if fuel
tank shows signs of damage or leaks.
S Debris Shield -- Discontinue use of unit if
debris shield is damaged.
INSPECT AND CLEAN UNIT AND
LABELS
S After each use, inspect complete unit for
loose or damaged parts. Clean the unit and
labels using a damp cloth with a mild deter-
gent.
S Wipe of f unit with a clean dry cloth.
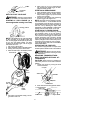
CLEAN AIR FILTER
A dirty air filter decreases engine perform-
ance and increases fuel consumption and
harmful emissions. Always clean after every
5 hours of operation.
1. Clean thecover and thearea around it to
keep dirt from falling into the carburetor
chamber when the cover is removed.
2. Remove parts as illustrated.
NOTE: Donotcleanfilteringasolineorother
flammablesolventtoavoidcreatingafirehaz-
ard or producing harmful evaporative emis-
sions.
3. Wash the filter in soap and water.
4. Allow filter to dry.
5. Replace parts.