


10
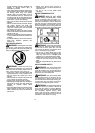
empty the fuel system before storage for 30
days or longer . Drain the fuel tank, start the en-
gine an dlet itrun u ntil t hefuellines andcarbure-
tor are em pty. Use fresh fuel next season.Nev-
er use engine or carburetor cleaner products in
the fuel tank or permanent damage may occur.
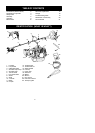
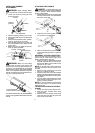
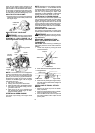
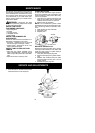
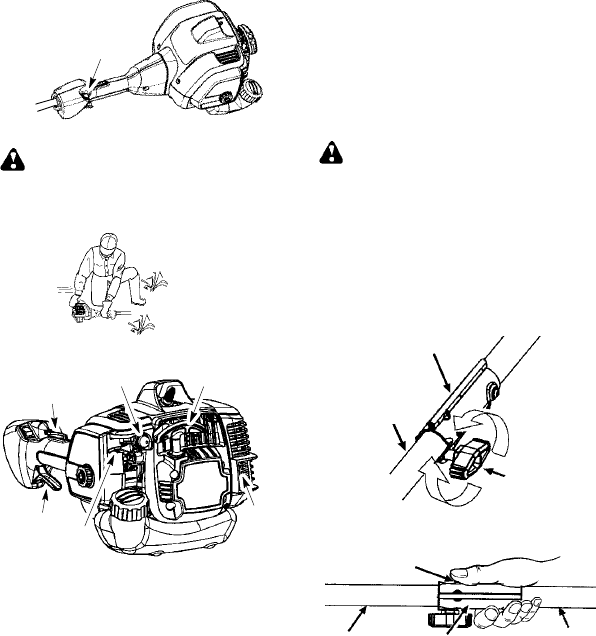
HOW TO STOP YOUR UNIT
S Stop theengine bypushingandholdingthe
ON/STOPswitchin theSTOP positionuntil
the engine stops.
ON/STOP
switch
HOW TO START YOUR UNIT
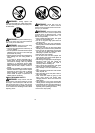
WARNING: Avoidany contact with the
muffler . A hot muffler can cause serious burns.
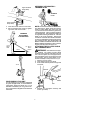
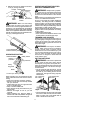
STARTING A C OLD ENGI NE (or a
war m engi ne after run ni ng out of fuel)
Starting position
Muffler
Start
le
v
er
Starter
handle
Primer
bulb
Throttle
trigger
Throttle
lock--out
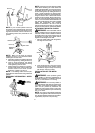
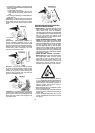
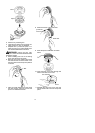
NOTE: The t hrottle lock--out is designed to
prevent unintentional use of the throttle trig-
ger. The lock--out must be pressed with the
palmof y ourhandas yougripthethrottle han-
dle before the trigger can be used. DO NOT
squeeze the throttle trigger until the engine
has started and runs.
1. Set unit on a flat surface.
2. Slowly press the primer bulb 6 times.
3. Move the start l e ver to t he START position.
4. Pull starter rope handle sharply until en-
gine starts and runs.
5. Allow unit to run for 10--15 seconds, then
fully squeeze the throttle trigger to disen-
gage the starting system.
STARTING A WARM ENGINE
Pull starter rope sharply until engine starts
and runs.
NOTE:Normally, t he warm starting procedure
can be used within 5 -- 10 minutes after the unit
is turnedoff. I f th eunit sits for m orethan 10min-
utes without being run, it will be necessary to
start the unit by following the steps under
STARTINGACOLDENGINEorfollowingthe
starting instruction steps shown on the unit.
STARTING A FLOODED ENGINE
Move the start lever to the RUN position and
fully squeeze throttle trigger. Pull the starter
handle repeatedly while squeezing throttle
triggeruntilenginestartsandruns.This could
require pullingthe starter handle manytimes,
depending on how badly the unit is flooded.
If the unit still doesn’t start, refer to TROUBLE-
SHOOTING T ABL E.
OPERATING THE COUPLER
This model is equipped with a coupler which
enables optional attachments to be installed.
WARNING: Always stopunit anddis-
connect sparkplug befor eremovingor instal-
ling attachments.
REMOVING TRIMMER ATTACH-
MENT (OR OTHER OPTIONAL AT -
TACHMENTS)
CAUTION:
When removingor installing at -
tachments, place t heunit ona f lat surfacefor
stability .
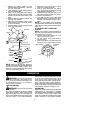
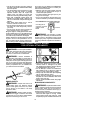
1. Loosen the coupler by turning the knob
counterclockwise.
Attachment
Coupler
Knob
LOOSEN
TIGHTEN
2. Press and hold the locking/release button.
Locking/Release
Button
Coupler
Upper Shaft
Attachment
3. Whilesecurelyholdingtheengineandup-
per shaft, pull theattachment straight out
of the coupler.
INSTALLING OPTIONAL ATTACH-
MENTS
1. Remove the shaft cap from the attach-
ment (if present).
2. Position locking/release button of attach-
ment into guide recess of coupler.
3. Push t heattachment intothe c oupleruntil
the locking/release button snaps into the
primary hole.