


26
E
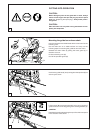
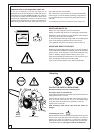
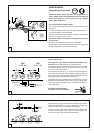
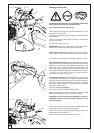
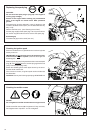
Working in winter
In order to prevent carburetor icing in conditions of low
temperature combined with high humidity, and below + 5°C in
order to get up to operating temperature faster, heated air can
be taken from the cylinder.
Remove the filter hood (see „Cleaning air filter“)
Remove the insert (10) and insert it as shown in position B for
cold-weather operation.
At temperatures above + 5°C the carburetor must NOT be fed
heated air. Failure to follow these instructions can lead to
damage to the cylinder and piston!
At temperatures over +5°C place the insert in position A for
normal operation.
Position A
- Normal operation
Position B
- Cold-weather operation
Reinstall the filter hood.
BA
10
D
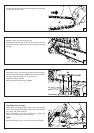
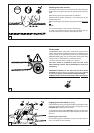
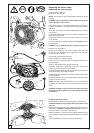
Adjusting the carburetor
Important information:
The carburetor of this tool is fitted with limiter caps which restrict
the range of adjustment and prevents over-rich mixture settings.
This ensures providing good engine power and efficient fuel
consumption. Before installing the limiter caps, the manufacturer
performs the „Basic Setting” procedure.
Carburetor adjustment is necessary for optimum engine
performance, for safer and more economical operation.
The engine should be warm, the air filter clean, and the
chain properly tensioned. Have carburetor adjustment
done by an authorised MAKITA service center.
The carburetor is factory-adjusted for the air pressure at sea
level. At other elevations or under other conditions of weather,
temperature, or humidity, or when breaking in a new engine, it
may be necessary to make slight adjustments to the carburetor.
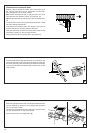
You will need a tachometer (9, part No. 950 233 210) for
optimum adjustment.
Do not go below the specified basic setting of the main
nozzle (H). Doing so may cause engine damage due to
overheating and insufficient lubrication!
Use the supplied carburetor screwdriver (8) for carburetor
adjustment. It has a moulded-on projection that aids in adjusting.
Before undertaking the adjustment, run the engine for 3-5
minutes to warm it up, but not at high speed!
For proper adjustment, proceed as follows:
1. Basic setting (engine off)
Start engine and warm up.
2. Set idle
3. Check top speed
4. Check acceleration
5. Check idle speed
Repeat steps 2-5 until you get the right idle speed, good
acceleration and maximum permissible
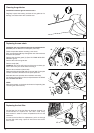
1. Basic setting
Carefully turn the adjusting screw for the idle nozzle (L)
clockwise until you feel a stop.
Turn adjusting screw (L) 1 turns counter-clockwise.
2. Set idle
Set the idle speed per the technical specifications.
Turning the adjusting screw (S) in (clockwise) increases
the idle speed. Turning it out (counter-clockwise) lowers
the idle speed. In no case should the chain move.
3. Check top speed
The top speed in the governor can be clearly heard from
the ignition misses. Important: To prevent engine
damage, never go more than a 1/4 turn in clockwise
with adjusting screw (H). Note: Since there is an
electronic speed governor (limiter) at 13,500 rpm that
cuts off the ignition current, the top speed cannot be read
from the tachometer.
4. Check acceleration
When the throttle is pressed, the engine should go
smoothly from idle to high speed. If this is too slow, turn
the adjusting screw (L) in small (max. 1/8 turns) incre-
ments counter-clockwise.
5. Check idle speed
Check the idle speed after setting the top speed (the
chain must not move).
Repeat the adjustment procedure starting at Step 2, until
the engine runs with the correct idle speed, good
acceleration, and top speed.
8 9
L H
S