


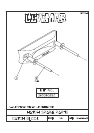

B4070
ISS B
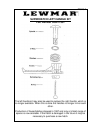
Concept Hatch Fitting & Adjustment Instructions
(To be retained in owners manual for future reference)
Concept hatches are for use on power craft in accordance with ISO/DIS 12216.2(E), DESIGN
CAT "A", AREAS II. Modification of the hatch by the fitting of vents etc. will invalidate the
compliance with thyis standard.
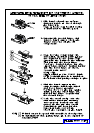
Fitting Instructions
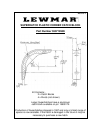
Concept hatches should be fitted to a flat surface with a maximum tolerance of +/- 1mm and a
deck / hull thickness of 20-40mm Check that all fastening will be clear of deck moulding radii etc.
Allow clearance for lid opening.
Mark the deck with a pencil around the outside edge of the frame flange.
It is essential that the frame is a snug fit and placed squarely on the deck opening.
When fitting a number of hatches it is advisable to prepare a template.
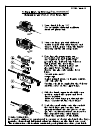
Cut out deck along pencil line using a suitable saw.
Where the deck is of composite construction, it is recommended that the exposed laminate be
sealed with the appropriate material prior to fitting the hatch. Openings cut in metal decks should
have all burrs and sharp edges removed.
Hatches should not be considered as stiffening members and it is recommended that the deck be
adequately stiffened to prevent distortion during heavy weather.
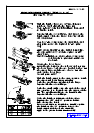
Re-check the frame on aperture and then apply bedding compound to the channel in lower frame.
Bedding compound must have good adhesive qualities (eg. silicone sealant), be a suitable grade
for marine sealing applications, of 3mm minimum thickness and compressible to allow the lower
frame to be pulled down in contact with the deck by the securing screws.
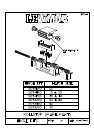
Position lower frame over hole and drill two fixing screw holes in opposite corners. Insert
appropriate stainless steel fasteners.(see below).
Deck type
Wood M5 through bolts or marine grade wood screws.
GRP/Steel/Al Alloy M5 through bolts or machine screws into suitable tapped plates.
Fixing Sizes M5, 10UNC, 2BA, 3/16", Wood screws (min. length 40mm).
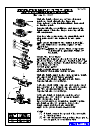
Drill remainder of holes and fasten down from the centre working out to the edges. Clean off
surplus sealant.
Once installed check for correct operation of the hatch lid, ie. closing/locking, even pressure of
seal etc.
Page 1 of 2 - Next Page