


7
Section 1: Assembly & Set-up
2/01/07
RBT1560, RBT1572 & RBT1584 Rear Blades 301-144M
Land Pride
Table of Contents
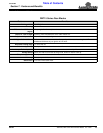
RBT15 Rear Blades
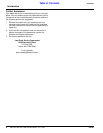
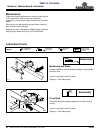
Refer to Figure 1-1:
1. Insert the blade assembly (#1) through the hole on
the main frame assembly (#2).
2. Place the pivot cap (#3) over the threaded shaft
protruding through the opening on the main frame
assembly (#2).
3. Thread on slotted hex nut (#4) until the vertical play
is removed from pivot.
4. Insert the cotter pin (#5).
5. Line up holes in the mainframe assembly and blade
assembly and insert lock pin (#6).
6. Position upper hitch mast (#7) on the main frame (#2)
and insert bolts (#8). Retain with lock washers (#9)
and hex nuts (#10). Tighten to proper torque.
!
CAUTION
Always check to be sure that the slotted hex nut and cotter pin
are in place to retain the blade before reversing the blade. If
they are missing, the blade will fall off the frame while being
rotated!
RBT15 3-Way Rear Blade Assembly
Figure 1-1
12015
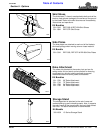
7. Install support leg (#11) into support stand bracket
and secure with 3/8" x 1 3/4" lg. roll pin (#12).
8. Secure the wire pin (#13) in the top hole when storing
the blade. Raise the leg all the way up and secure the
wire pin in the bottom hole when the blade is
attached to a tractor.
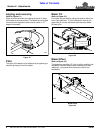
3-Point Hook-Up
Refer to Figure 1-2
!
DANGER
Tractor hook-up can be hazardous to your health or that of
your helper. Do not allow anyone to stand between the rear
blade and the tractor during hook-up operations. Do not
operate the hydraulic 3-point lift controls while someone is
directly behind the tractor.
1. Slowly back the tractor up to the rear blade and use
the tractor’s 3-point hydraulic control to adjust the
lower link arms up or down to match the height of the
rear blade hitch pins.
!
DANGER
Engage parking brake, shut off tractor and remove key before
dismounting from the tractor.
2. Slide the lower link arms hitch link holes onto the rear
blade hitch pins.
3. Install a linch pin or other fastener (supplied by
customer) through the hitch pin hole to lock the lower
links into position.
4. Connect the top link to the upper pivot hitch using a
clevis pin supplied by the customer.
Tractor 3-Point Hitch
Figure 1-2
13809
Section 1: Assembly & Set-up