


21
Section 5: Maintenance and Lubrication
12/17/07
RCR1860 and RCR1872 Series Rotary Cutters 312-849M
Land Pride
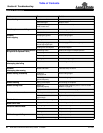
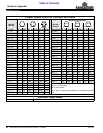
Table of Contents
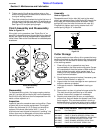
5. Tighten each of the 8 spring retainer nuts on the
clutch housing exactly 2 revolutions to restore clutch
to original setting pressure.
6. The clutch should be checked during the first hour of
cutting and periodically each week. An additional set
of scribe marks can be added to check for slippage.
See Figure 5-5 to adjust spring length.
Clutch Assembly and Disassembly
Refer to Figure 5-4:
If the clutch run-in procedure, (see “Clutch Run-In” on
page 20), indicated that one or more of the friction discs did
not slip, the clutch must be disassembled to separate the
friction discs. Refer to the Parts Manual for a detailed parts
breakdown.
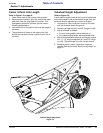
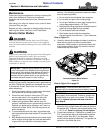
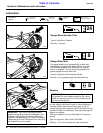
Clutch Disassembly
Figure 5-4
Disassembly
To disassemble the clutch, first remove spring retainer
nuts (#1), springs (#2) and bolts (#3) from the assembly.
Each friction disc (#4) must then be separated from the
metal surface adjacent to it.
Inspection
Inspect all parts for excessive wear and condition. Clean
all parts that do not require replacement.The original
friction disc thickness is 1/8" (3.2mm) and should be
replaced if thickness falls below 3/64" (1.1mm). If
clutches have been slipped to the point of “smoking”, the
friction discs may be damaged and should be replaced.
Heat build-up may also affect the yoke joints.
19783
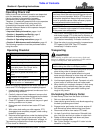
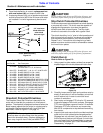
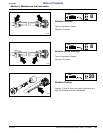
Assembly
Refer to Figure 5-5:
Reassemble each friction disc (#4) next to the metal
plate it was separated from. Install bolts (#3) through the
end plates and intermediate plates as shown. Place
springs (#2) over the bolts and secure with nuts (#1).
Progressively tighten each spring retainer bolt until
correct spring height “A” is reached.
Clutch Adjustment
Figure 5-5
Cutter Storage
It is good practice to clean off any dirt or grease that may
have accumulated on the cutter and on any moving parts
if the cutter will not be used for several days and at end
of the working season.
1. Clean off any dirt or grease that may have
accumulated on the cutter and moving parts. Scrape
off compacted dirt from the bottom of deck and then
wash surface thoroughly with a garden hose. A
coating of oil may also be applied to the lower deck
area to minimize oxidation.
2. Check blades for wear and replace if necessary, see
“Service Cutter Blades” on page 19.
3. Inspect cutter for loose, damaged or worn parts and
adjust or replace as needed.
4. Lubricate as noted in “Lubrication” starting on
page 22.
5. Store cutter in a clean, dry place for longer cutter life.
The deck should be positioned on a flat stable
surface. Use auxiliary supports if necessary.
6. Repaint parts where paint is worn or scratched to
prevent rust. Ask your dealer for Aerosol Land Pride
touch-up paint. They are also available in touch-up
bottles with brush, quarts and gallon sizes by adding
TU, QT or GL to the end of the Aerosol part number.
19784
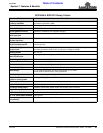
Land Pride Aerosol Touch-up Paint
Part No. Part Description
821-011C PAINT LP BEIGE AEROSOL SPRAY CAN
821-002C PAINT LP BLACK AEROSOL SPRAY CAN
821-054C PAINT MEDIUM RED AEROSOL SPRAY CAN
821-058C PAINT GREEN AEROSOL SPRAY CAN
821-066C PAINT ORANGE AEROSOL SPRAY CAN
821-067C PAINT BLUE AEROSOL SPRAY CAN