


10
Section 1: Assembly and Set-Up
RCR1542 and RCR1548 Rotary Cutters 312-556M
11/25/15
Table of Contents
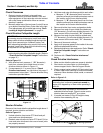
Driveline Installation
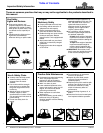
!
DANGER
Do not engage tractor PTO while hooking-up and unhooking
driveline or while someone is standing near the driveline. A
person’s body and/or clothing can become entangled in the
driveline resulting in serious injury or death.
!
DANGER
All guards and shields must be installed and in good working
condition at all times during cutter operation.
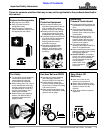
!
WARNING
Always disengage PTO, put tractor in park or set park brake,
shut tractor engine off, remove ignition key, and wait for
blades to come to a complete stop before dismounting tractor.
!
WARNING
Do not over-speed PTO or machine breakage may result.
Some tractors are equipped with multispeed PTO ranges. Be
certain your tractor’s PTO does not exceed 540 RPM.
!
WARNING
Do not use a PTO adaptor with a quick hitch. A PTO adapter
will increase strain on the tractor’s PTO shaft resulting in
possible damage to shaft and driveline.
IMPORTANT: An additional driveline may be
required if cutter is to be used on more than one
tractor, especially if a Quick Hitch is used.
The driveline must be lubricated before putting it into
service. Refer to “Lubrication Points” on page 24.
The tractor’s PTO shaft and cutter gearbox shaft
must be aligned and level with each other when
hooking-up the driveline to the tractor.
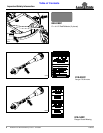
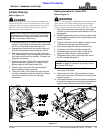
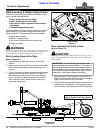
Driveline Installation
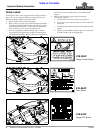
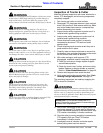
Figure 1-3
Refer to Figure 1-3:
1. Unsnap side access covers (#4) from both sides of
the gearbox shield. Save covers for reuse.
2. Remove bolt (#2) from end of driveline (#5).
3. Slide driveline (#5) onto gearbox input shaft until
holes in driveline yoke aligns with hole in gearbox
input shaft.
4. Insert bolt (#2) through driveline yoke and gearbox
input shaft.
5. Secure bolt with removed nut (#3). Tighten hex nut to
the correct torque.
6. Skip to step #8 if installing a slip clutch driveline.
7. If driveline (#5) has a shear bolt instead of a slip
clutch, install snap ring (#1) onto the gearbox input
shaft groove. Discard snap ring if driveline has a slip
clutch.
8. Reinstall access covers (#4).
9. Raise driveline (#5) up and rotate driveline hook (#6)
down.
10. Lower driveline (#5) until resting in driveline
hook (#6).
11. Continue with “3-Point Hook-Up” on page 11.
30240
NOTE: Snap ring (#1) is for extra security should
driveline shear bolt (#2) break. Do not use snap ring
with a slip clutch driveline.