


8
Section 1: Assembly and Set-Up
RCR1542 and RCR1548 Rotary Cutters 312-556M
11/25/15
Table of Contents
Dealer Assembly
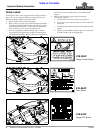
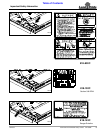
Figure 1-1
26580
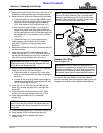
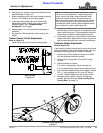
IMPORTANT: Some small tractors with a Cat. I 3-point hitch cannot lift
cutter high enough for transporting or is not heavy enough in the front to
properly lift the cutter. If you are experiencing this problem, attach A-
frame bars (#6) and hitch pins (#20) in lower 3-point mounting holes “B”.
Section 1: Assembly and Set-Up
Tractor Requirements
Tractor horsepower should be within the range noted
below. Tractors outside the horsepower range must not
be used.
Horsepower Rating. . . . . . . . . . . . . . . . . . . .20-50 HP
Rear PTO Shaft Type . . . . . . . . . . . . . 1 3/ 8"-6 Spline
Rear PTO Speed . . . . . . . . . . . . . . . . . . . . 540 RPM
Hitch Type . . . . . . . . . . . 3-Point Cat. l or Cat I limited
Hydraulic Outlets . . . . . . . . . . . . . . . . . .Not Required
Tractor Weight . . . . . . . . . See Important Note Below
!
WARNING
Ballast weights may need to be added to your tractor to
maintain steering control. Refer to your tractor operator’s
manual to determine proper ballast requirements.
Torque Requirements
Refer to “Torque Values Chart” on page 30 to
determine correct torque values for common bolts. See
“Additional Torque Values” at bottom of chart for
exceptions to standard torque values.
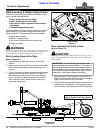
Dealer Assembly
Refer to Figure 1-1:
1. Remove linchpins (#18) and hitch pins (#20) from
shipping crate. Discard small linchpins (#18) as they
are for shipping purposes only. Keep jam nuts (#19),
flat washers (#17), and lock washers (#15).
2. Bushings (#4) are zip tied to top hitch (#13).
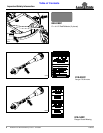
3. Hex nuts (#11) and snap ring (#7) are shipped stored
on clevis pin (#22). Remove hairpin cotter (#21),
clevis pin (#22), nuts (#11), and snap ring (#2).
4. Reattach clevis pin (#22) to A-frames (#6) with
hairpin cotter (#21). Keep nuts (#11) and snap
ring (#7) for hitch pin and driveline assemblies.
NOTE: Do not tighten hardware to the correct
torque until assembly is complete.
IMPORTANT: Length of lower hitch pins can be
adjusted with jam nut (#19) to operator preference.
Make certain there are two or more threads showing
beyond hex nuts (#11) after they are torqued tight.