


14
Section 5 Maintenance and Lubrication
FDR15 Rear Discharge Grooming Mowers 310-188M 5/8/08
Land Pride
Table of Contents
Section 5 Maintenance and Lubrication
Maintenance
Proper servicing and adjustment is the key to the long life
of any implement. With careful and systematic inspection,
you can avoid costly maintenance, time and repair.
After using the unit for several hours, check all bolts to be
sure they are tight.
Replace any worn, damaged or illegible safety labels by
obtaining new labels from your Land Pride Dealer.
!
CAUTION!
For safety reasons, each maintenance operation must be per-
formed with tractor PTO disengaged, the mower lowered com-
pletely to the ground or folded with the transport locks engaged
and the tractor engine shut off with ignition key removed.
• After using the mower for several hours, check all bolts
to be sure they are tight and check the tension of the
drive belt. Refer to Belt Tension in the “Adjustments”
section on page 12.
• Lubricate items as listed under Lubrication, this section,
starting on page 15.
• Always maintain the proper air pressure in the tires. The
Tire Inflation Chart is located in the “Appendix” section
on page 18.
• Replace any worn, damaged or illegible safety labels by ob-
taining new labels from your Land Pride Dealer. Information
about labels is located under Safety Labels in the “Impor-
tant Safety Information” section starting on page 1.
Service Mowing Blades
Blade Sharpening
Blades should be sharpened at each end to the same an-
gle as the original cutting edge.
Balance each blade after sharpening.
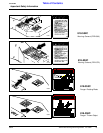
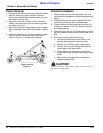
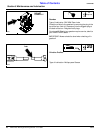
Blade Replacement
IMPORTANT: Always install blade with the cutting edge
facing direction of rotation. Refer to Figure 3-2 on page 12
for proper blade placement due to different rotations on
decks.
1. Remove the bolt and blade washer from the bottom of
the blade to be replaced. Remove blade.
2. Install the blade washer into the center hole on blade.
3. Replace the bolt. Tighten to the proper torque as listed
in the Torque Values Chart in the “Appendix” section
on page 18.
IMPORTANT: Replace blades with Land Pride blades only.
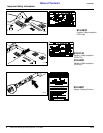
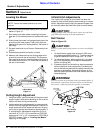
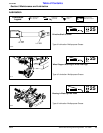
V-Belt Installation
These illustrations are also on the labels located on the
top of the mower decks.
1. Remove the right hand and the left hand belt covers.
2. Disengage belt tensioning latch by turning release nut
with a 3/4" socket or wrench.
3. With tension relieved from belt remove old belt from
pulleys.
4. To install a new belt be sure the belt is positioned in all
the pulley grooves. Engage belt tensioning latch by
turning release nut with a 3/4" socket or wrench to ap-
ply tension to new belt. Check the belt tension, refer to
Figure 3-2 on page 12.
5. Reinstall all belt covers and secure in place with hard-
ware.
Storage
At the end of the working season or when the mower will
not be used for a long period, it is good practice to clean off
any dirt or grease that may have accumulated on the
mower and any of the moving parts.
1. Clean as necessary.
2. Check the blades for wear and replace if necessary,
see Service Mowing Blades, this section on page 14.
3. Inspect the mower for loose, damaged or worn parts
and adjust or replace as needed.
4. Lubricate as noted in the Lubrication portion of this
section starting on page 15.
5. Store unit inside if possible for longer life.
Repaint parts where paint is worn or scratched to prevent
rust. Ask your dealer for Aerosol Land Pride Beige touch-
up paint #821-011C.
AIR TIRES (AIR PRESSURE):
Tire Sealant: Heavy Duty tire sealant has been added in
Air tires to help reduce air loss from punchers due to nails/
thorns etc....
NOTE: Care should be taken in order not to remove
any more material than necessary to sharpen blade.
NOTE: Under inflated tires can roll off of rim. Maintain-
ing air pressure within 5 PSI of maximum tire pressure
reduces the risk of tires rolling off of rim.