


14
Section 5 Maintenance and Lubrication
FD1548 & FD1560 3-Spindle Grooming Mower 310-155M
7/18/08
Land Pride
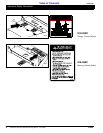
Table of Contents
Section 5 Maintenance and Lubrication
Maintenance
!
CAUTION
For Safety reasons, each maintenance operation must be
performed with the tractor’s PTO disengaged, the mower
lowered completely, tractor engine shut off and ignition key
removed.
General Description
Proper servicing and adjustment is the key to the long life
of any farm implement. With careful and systematic
inspection, you can avoid costly maintenance, time and
repair.
General Maintenance
Blade Sharpening
1. Blades should be sharpened at each end to the same
angle as the original cutting edge.
2. Balance each blade after sharpening.
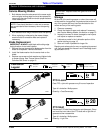
Blade Replacement
IMPORTANT: Always install blade with cutting edge
facing direction of blade spindle rotation.
1. Remove cap screw and blade washer from blade to be
replaced. Remove blade.
2. Install blade washer into center hole on blade.
3. Replace cap screw. Tighten bolts to proper torque,
see the "Torque Values Chart for Common Bolt
Sizes" section on page 19.
IMPORTANT: Replace blades with Land Pride blades
only.
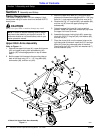
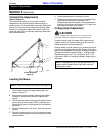
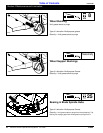
FD1548 V-BELT INSTALLATION
Refer to Figure 5-1:
1. Remove right hand, left hand and center belt covers.
2. Using 3/4" socket wrench, pivot over-center latch.
Rotate idler pulley toward rear of mower.
3. With tension relieved from belt remove old belt from
pulleys.
4. Install new belt referring to the figure below (or refer to
the decal on top of mower deck). Be sure belt is
positioned in all the pulley grooves. Reinstall over-
center latch using socket wrench. Recheck spring
tension.
5. Reinstall all belt covers and secure in place with
hardware.
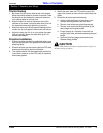
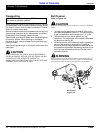
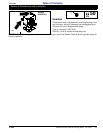
FD1560 V-BELT INSTALLATION
Refer to Figure 5-2:
1. Remove belt covers. Loosen spring take-up eyebolt to
remove belt tension.
2. Move belt take-up handle in a clockwise direction to
relieve tension on belt.
3. With tension relieved from belt remove old belt from
pulleys.
4. Install new belt referring to the figure below (or refer to
the decal on top of mower deck). Be sure belt is
positioned in all the pulley grooves. Tighten belt take-
up handle spring eyebolt to apply tension to new belt.
5. Reinstall all belt covers and secure in place with
hardware.
Belt Tension
!
CAUTION
Belt drive system under spring tension; use care to avoid bodily
harm!
1. Belt tension should be checked after approximately 20
hours of operation on a new belt.
2. Not enough tension on the belt may lead to premature
failure of the belt due to excessive slipping of the belt.
Refer to “Belt Tension” page 12 for proper adjustment of
belt tension.
!
WARNING
Excessive tension on the belt may lead to premature failure of
belt and drive components. Excessive tension on the belt may
also lead to a safety hazard to the operator or bystanders.
AIR TIRES (AIR PRESSURE):
Tire Sealant: Heavy Duty tire sealant has been added in
Air tires to help reduce air loss from punchers due to
nails/thorns etc.
NOTE: Care should be taken in order not to remove
any more material than necessary to sharpen blade.
FD1548 V-Belt Installation
Figure 5-1
FD1560 V-Belt Installation
Figure 5-2
NOTE: Under inflated tires can roll off of rim.
Maintaining air pressure within 5 PSI of maximum tire
pressure reduces the risk of tires rolling off of rim.