


4
Wireless Self-Emptying Rain Sensor (TX58UN-IT)
The rain sensor should be mounted on a level surface in an open area within the 200-foot wireless range of the thermo-hygro sensor and on
the same side of the house. Mount the rain sensor at least 6 feet off the ground level for optimum wireless transmission. The rain sensor should
be accessible to allow for periodic cleaning of debris or insects. Do not over tighten mounting screws. They should be snug not tight to prevent
inaccurate readings.
Wireless Solar Powered Wind Sensor (TX63U-IT)
The wind sensor must be installed with the front of the sensor (the solar panel) facing true south, or the reported wind direction
will not be accurate. Mount within the 200-foot wireless range of the thermo-hygro sensor and on the same side of the house at a minimum
height of 6 feet. The roof may or may not be an ideal mounting location. Secure the main unit to the shaft of the mast holder. Use the right-
angle adaptor if the wind sensor will be mounted on a horizontal mast or surface.
Fasten the wind sensor to a suitable mast using the U-bolt, washers and nuts included. Note: Mount the wind sensor onto a mast so the wind
can reach the sensor unobstructed from all directions for an accurate reading. The ideal mast is between 0.62" and 1.3” in diameter. The wind
sensor DOES NOT have replaceable batteries - it consumes solar power and charges the internal battery pack automatically.
Wireless Thermo-Hygro (Sensor TX59UN-1-IT)
The thermo-hygro sensor is "weather resistant", but not "water proof". To ensure an extended life of your sensor, mount it in a semi-
covered
place out of the elements. Minimum height is 6 feet; under the eaves on the North side of the house can be ideal to avoid the effects of
sunlight. Mount the sensor 18" down from the eaves to ensure optimum performance. This will assure the temperature of the air coming out
of the attic will not affect data collected by the sensor.
To wall mount the thermo-hygro sensor, fix the wall holder onto the desired wall using the included screws, plug the sensor firmly into the wall
holder and replace the rain cover if it is not already in place.
Note: After mounting the sensors, if the weather data is not received, press and hold the ▲/DATE button for 2 seconds to synchronize the wireless weather
station to the sensors.
Wireless Weather Station (C84612)
The Wireless Weather Station is free standing with the fold out base stand or can be wall mounted.
Wall mount:
• Fix a screw (not supplied) into the desired wall, leaving the head extended out the by about 0.2 inches (5mm).
• Hang the weather station onto the screw. Ensure that it locks into place before releasing the professional weather station.
Free standing: Simply pull out the stand to the back of the weather station and place on a flat surface.
Position:
• Choose a location 6 feet or more from electronics such as cordless phones, gaming systems, televisions, microwaves, routers,
baby monitors, etc., which can prevent signal reception.
• Place within range of the outdoor transmitters. The maximum transmitting range in open air is 200-feet (60 meters).
• Be aware of electrical wires and plumbing within a wall. This will interfere with signal reception.
• Obstacles such as walls, windows, stucco, concrete, and large metal objects can reduce the range.
La Crosse Alerts Gateway Set (OPTIONAL: Used ONLY if you want to use the remote monitoring and alert features.)
• The Gateway should be installed indoors in an easy-to-reach location near your network router, A/C power outlet and within
range of the wireless weather station (200 feet in open space).
• After you complete the activation on www.lacrossealerts.com, you may mount the gateway to the wall with the included
mounting plate and drywall anchors.
• Online registration requires that you press the gray button on the Gateway during setup.
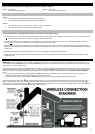
Stand-Alone Weather Station OR Internet Connected Weather Station with Remote Monitoring & Alerts
Use the weather station as:
• (OPTION 1 ) Stand-alone weather station with wireless backyard weather sensors. Included Gateway Set and Activation Card is not required.
Wireless weather station information and manual are available at: www.lacrossetechnology.com/c84612
• (OPTION 2) Internet-connected weather station with remote monitoring and alerts uses the included Gateway Set and Activation Card to enable
the included Remote Monitoring & Text/E-mail Alerts from www.lacrossealerts.com
• Remote Monitoring & Text/E-mail Alerts are included to remotely monitor your home & backyard weather on www.lacrossealerts.com using your
smartphone, tablet or computer.*
• Set & receive custom e-mail & text alerts for:*
• Outdoor temperature & humidity
• Wind & rain
• Barometric pressure
• Indoor temperature & humidity
• High-speed Internet access, network router & Internet-enabled device with web browser required (not included)
• E-mail account and/or SMS text ability for remote monitoring & alerts required (not included)
• Connect the gateway to your router (not included) with the LAN cable, for wireless connection to the weather station.
Note: See the included Activation Card for the activation key to enable remote monitoring and alerts.* There is no app. or software to install.
All remote monitoring is done on www.lacrossealerts.com with an account that you create if you wish to use these added features.*
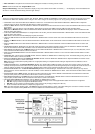
Weather Station Features 14 Alarms
• High/Low: Pressure, Indoor Temperature, Indoor Humidity,
Outdoor Temperature and Outdoor Humidity
• High: Wind Gust
• Wind Direction