


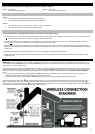


2
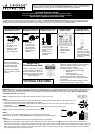
• Wait 10 minutes for reception from all sensors before setting time and date or mounting sensors outside.
STEP 6: Set Time and Date. See “Program Menu” below.
Setup Troubleshooting: If the sensor data fails to display for any of the outdoor sensors within 10 minutes, (“- - -“are displayed), remove the batteries from
all units for 1 minute and start the Setup procedure again at Step 1.
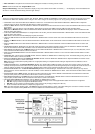
Weather Station Program Menu
There are 5 function buttons located on the unit: SET, ▲/DATE, ▼/RAIN, ALARM, and MIN/MAX. The SET button moves through the program menu. Press
and release the ▲/DATE or ▼/RAIN button to change a value. Save changes and exit the program menu at any point by pressing the MIN/MAX button.
• CONTRAST: Press and hold the SET button. LCD and a number from 1-8 will flash. Press and release the ▲/DATE or ▼/RAIN button to adjust the
Contrast of the LCD. Press and release the SET button to confirm and continue.
• HOUR: The Hour will flash. Press and release the ▲/DATE or ▼/RAIN button until the correct Hour is shown. Press and release the SET button to confirm
and continue.
Note: When in 12h mode, there is only a 'PM' display, which appears under the word TIME. During the 'AM' hours this area will be blank.
• MINUTES: The Minutes will flash. Press and release the ▲/DATE or ▼/RAIN button until the correct Minutes are displayed. Press and release the SET
button to confirm and continue.
• 12/24-HOUR TIME: 12h or 24h will flash. To change between 12h and 24h, press and release the ▲/DATE or ▼/RAIN button. Press and release the SET
button to confirm and continue.
Note: When in 24-hour time the date will display Day first, then Month.
• YEAR: The Year will flash. Press and release the ▲/DATE or ▼/RAIN button to set the correct Year. Press and release the SET button to confirm and
continue.
• MONTH: The Month will flash. Press and release the ▲/DATE or ▼/RAIN button to set correct Month. Press and release the SET button to confirm and
continue.
• DATE: The Date will flash. Press and release the ▲/DATE or ▼/RAIN button to set the correct Date. Press and release the SET button to confirm and
continue.
• FAHRENHEIT/CELSIUS: °F will flash in the wind chill, indoor temperature and outdoor temperature areas. Press and release the ▲/DATE or ▼/RAIN
button to select between Fahrenheit and Celsius. Press and release the SET button to confirm and continue.
• WIND SPEED UNIT: Wind Speed unit MPH will flash. Press and release the ▲/DATE or ▼/RAIN button to select from mph, m/s, knots, Beaufort, or km/h.
Press and release the SET button to confirm and continue.
• RAIN UNIT: Rainfall Inches will flash. Press and release the ▲/DATE or ▼/RAIN button to select in or mm. Press and release the SET button to confirm
and continue.
• PRESSURE UNIT: The Air Pressure unit inHg will flash. Press the ▲/DATE or ▼/RAIN button to select inHg or hPa. The default setting is inHg. Press and
release the SET button to confirm and continue.
• RELATIVE PRESSURE SETTING: The Relative Air Pressure will flash. Press the ▲/DATE or ▼/RAIN button to adjust the Relative Air Pressure. Press
and release the SET button to confirm and continue.
Note: Refer to your local weather reporting station for an appropriate setting. It is important that this setting be adjusted for local conditions to ensure
forecast accuracy.
• FORECAST SENSITIVITY: The Forecast Sensitivity will flash. The default setting of .09 works well in most areas of the country, however in areas with
relatively constant pressure this should be set to .06, (within 30 miles of the coast) and in areas with significant pressure changes this should be set to 0.12
(within 30 miles of the desert). Press the ▲/DATE or ▼/RAIN button to adjust. Press and release the SET button to confirm and continue.
• STORM ALARM SENSITIVTY: The Storm Alarm Sensitivity will flash. The default setting of .15 works well in most areas, however you may need to
adjust this level up or down depending on your local conditions. Use the ▲/DATE or ▼/RAIN button to adjust. Press and release the SET button to confirm
and continue.
• STORM ALARM: AON or AOFF will flash. This will turn the Storm Alarm ON or OFF. Use the ▲/DATE or ▼/RAIN button to toggle the Storm Alarm ON
(AON) and OFF (AOFF). Press and release the SET button to confirm and continue.
• WIND DIRECTION DISPLAY: The Dash in the wind compass will flash. Use the ▲/DATE or ▼/RAIN button to select the Wind Direction to be shown in
degrees (dash) or letters NNW. Press and release the SET button to confirm and continue.
• FACTORY RESET: Res off will be displayed. Use the ▲/DATE or ▼/RAIN button to select:
o Res LO to reset the Internet connection only (all weather station readings remain unchanged) Weather station will need to be re-registered.
o Res ALL only if you wish to Factory Reset the Weather Center.
o Res OFF If you do not wish to restart the weather center, but were only changing settings (time date etc.).
o Press and release the SET button to complete the program menu.
Note: To Factory Reset the weather center, select Res on and press the SET button to confirm. The station will begin to count down numbers in the date
area. When it is complete it will say Done. Then remove the batteries and follow the Restart up procedure.
Weather Station LCD Overview