


3
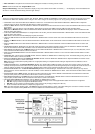
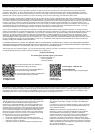
Weather Station Display Modes
Press and release the SET button to toggle between the display of Mode 1 or Mode 2:
MODE 1: Wind Speed MODE 2: Wind Gust
24 hr. Pressure History Graph 72 hr. Pressure History Graph
Other Buttons Provide Multiple Functions
▲/DATE:
• Press and release to switch between Date and Seconds display.
• Press and hold until the station beeps to search for remote sensors.
▼/RAIN:
• Press and release to view 1-hour, 24-hour, 1-week, 1-month or Total Rainfall.
• Press and hold to sync the weather station with the gateway.
Rain Display
For all measurements, it is important time and date are set correctly on your weather station.
• 1-HOUR RAIN: The 1-hour rain reflects rain that has fallen from current time and back 1-hour. It updates every four minutes (15 measurements). The hour
is not a fixed clock time measurement. It is literally an ongoing “last 60 minutes” timer.
• 24-HOUR RAIN: The 24-hour rain reflects the rain that has fallen from current time and back 24-hours. This is not a midnight to midnight measurement.
The day is not a fixed clock time measurement. It is literally an ongoing “last 24 hours” timer.
• WEEKLY RAIN: The amount of rainfall of the previous week. Week: Rain total for the week is reset every 7 days. Week begins 1 day before the day the
batteries are first inserted into the weather station. For example, if the batteries are inserted on a Thursday, the start of the weekly totals will be Wednesday
of each week.
• MONTHLY RAIN: Monthly rain reflects the previous month’s rain and will update 12AM the first day of the month.
• TOTAL RAIN: Total rain will remain until you manually reset this value. Total rain reflects the rain from time of weather station set-up until you manually
reset the total rain.
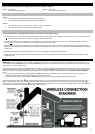
Proper Placement of Weather Station, Sensors and Optional Gateway with Mounting Instructions
IMPORTANT: Ensure that all of the sensor data can be received at the intended mounting locations before you drill mounting holes. The outdoor sensors
have a wireless range of 200-feet. Keep in mind that the 200-foot range equates to an open-air scenario with no obstructions. Each obstruction (roof, walls,
floors, ceilings, etc.) will reduce the range.
The thermo-hygro sensor measures outdoor temperature & humidity and collects the data from the wind and the rain sensors and sends all outdoor weather
data to the wireless weather station, so the thermo-hygro sensor must be within the 200-foot wireless range of the wireless weather station. This allows the
wind and rain sensors to be placed relative to the thermo-hygro sensor rather than the wireless weather station. See the Wireless Connection Diagram
below.
• The wind and rain sensors must be mounted within the 200-foot wireless range of the thermo-hygro sensor and on the same side of the house. In
addition, 915 MHz sensors transmit better at a minimum mount height of 6 feet.
• The wireless weather station must be within the 200-foot wireless range of the gateway to upload weather data to the Internet.
If the sensor wireless reception icons drop from the weather station as you move them into their intended locations, the sensors may be too far from the
wireless weather station. Try moving the wireless weather station or the sensors closer and wait a few minutes to see if the wireless reception icons
display again. If the wireless reception icons are still not displayed after re-positioning the sensors or the wireless weather station, hold the ▲/DATE button
for 2 seconds to re-synchronize the wireless weather station with the sensors.