


1
Wireless Weather Station
Monitor home & backyard weather with the stand-alone Wireless Weather Station,
or use included remote monitoring & alerts on your smartphone, tablet or computer.*
Model C84612 | Hardware Quick Setup Guide
The Wireless Weather Station information and full manual are available at: www.lacrossetechnology.com/c84612. The system works as a stand-alone
Weather Station or a Remote Monitoring Weather Station when using the included La Crosse Alerts Gateway*. There is no app. or software to install.
All remote monitoring is done on www.lacrossealerts.com with an account that you create if you wish to use these added features.*
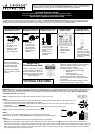
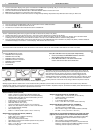
CAREFULLY OPEN THE PACKAGE AND LOCATE THE FOLLOWING CONTENTS:
Wireless Solar Powered
Wind Sensor TX63U-IT
Wireless Self-Emptying
Rain Sensor TX58UN-IT
Wireless Thermo-Hygro
Sensor TX59UN-1-IT
Wireless Weather
Station C84612
La Crosse Alerts
Gateway Set (Optional)
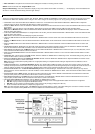
1. Mast holder
2. Right angle adaptor
3. 1 x U-bolts
4. 2 Washers + 2 Nuts
5. Plastic Reset Rod
6. 100% solar-powered
1. Base sensor,
funnel top cover
and battery cover
(pre-assembled)
2. Requires two “AA”
Alkaline batteries
(included)
1. Airflow cover
2. Wall mount adapter
3. Mounting screws
4. Plastic anchors for
screws
5. Requires two “C”
Alkaline batteries
(included)
1. Foldout stand
2. Requires three “C”
Alkaline batteries
3. (included)
1. Gateway
2. 20-volt A/C Adapter
3. Ethernet (LAN) cable;
Connects your network
router with high-speed
Internet (not included)
to Gateway
All items, including Wind
Sensor, are Protected under
U.S. Patents: 5,978,738;
6,076,044; & 6,597,990
Wind Sensor also Protected
under U.S. Patent: 6,761,065;
RE42,057
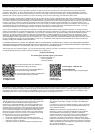
Remote Monitoring & Alerts Account Activation Card
Remote Monitoring & Text/E-mail Alerts
IMPORTANT!!
Do Not Discard Card:
Contains the Activation Key to enable
remote monitoring and alerts on
www.lacrossealerts.com. Please file
for your future records if you do not
wish to use the Internet connected
features at this time.
• Optional Remote Monitoring & Text/E-mail Alerts are
included to remotely monitor your home & backyard
weather on www.lacrossealerts.com from your
smartphone, tablet or computer.*
• Set & receive custom e-mail & text alerts:*
• Outdoor temperature & humidity
• Wind & rain
• Barometric pressure
• Indoor temperature & humidity
• High-speed Internet access, network router &
Internet-enabled device with web browser required
(not included)
• E-mail account and/or SMS text ability for remote
monitoring & alerts required (not included)
SETUP INSTRUCTIONS STEP BY STEP
IMPORTANT: Make sure to observe the correct polarity when inserting batteries. The "+" markings on the batteries must line up with the diagrams inside the
battery compartments. Inserting the batteries incorrectly may result in permanent damage to the units. During the initial setup process, place the
wireless weather station and the outdoor sensors on a surface with 5-10 feet between each sensor and the weather station. Only use Alkaline batteries,
rechargeable batteries may not work:
STEP 1: Complete initial setup on a table with all components within 10 feet of each other.
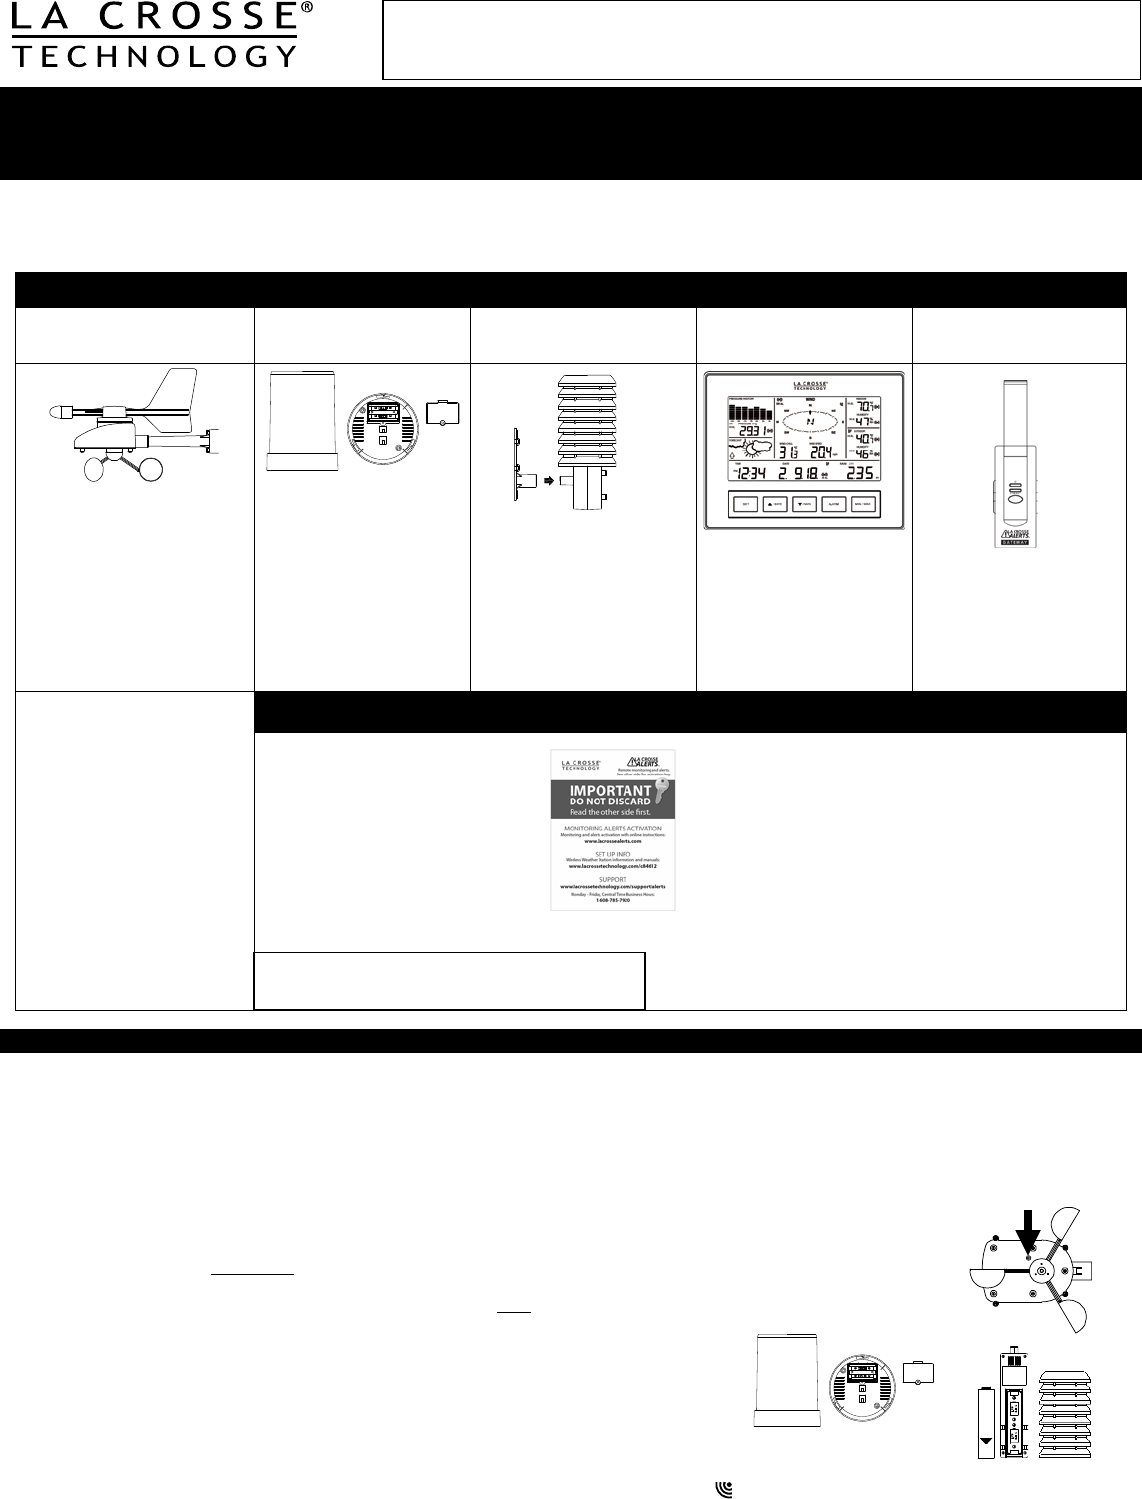
STEP 2:
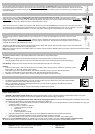
• It is important to allow sufficient light to reach the solar panel while activating the wind sensor. Make sure the lights are on in the
setup room and the solar panel is facing a 60W light bulb or brighter.
• Ensure the solar panel is not covered, and then remove the black protective foil on the solar panel. Remove the tape covering
the reset hole.
• Use the provided plastic reset rod to gently press the reset button once in the hole on the bottom of the sensor.
STEP 3: Insert two "AA" size batteries into rain sensor with correct polarity.
STEP 4:
• Insert two "C" size batteries into the thermo-hygro sensor with the correct polarity.
Note: Allow all sensors to run for two minutes before inserting batteries in the weather station.
STEP 5:
• Insert three "C" size batteries into the wireless weather station with the correct polarity.
• Note: Every time the wireless weather station receives data from the sensors, the wireless icons will blink once and then return to solid if the last
transmission was successful. A wind speed or rainfall amount that reads "0" does not mean reception failure. It means that there was no wind or rain at the
time of the last measurement. The thermo-hygro sensor syncs with the wind and rain sensors and sends all outdoor sensor data to the weather station. The
thermo-hygro sensor tries for 4 minutes to sync to the wind sensor and then 4 minutes for the rain sensor. If not successful within 4 minutes, the thermo-
hygro sensor will stop looking for the other sensors.
Press Reset Button on
Bottom of Wind Sensor
(Solar Panel Must Face
Light)
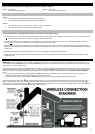
Once you have set up the Wireless Weather Station with this guide, if you wish to activate the optional
remote monitoring and alerts features, visit www.lacrossealerts.com to create a personal account
and follow the easy, step-by-step online instructions to guide you through activation.
OPTIONAL FEATURES