


Operating - 6
OPERATING
Operating
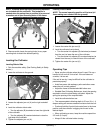
Using Cultivator
The most common uses for a cultivator:
1. Weed control in emerging gardens:
• Straddle row cultivation: By straddling the cultivator
over the plant row, weeds on each side of the row of
plants can be dislodged.
• Between row cultivation: Using the full width of the
cultivator, the space between rows of plants can be tilled
to loosen the soil and dislodge weeds (a minimum
space between rows of 1.27-1.40 m (50-55 in.) is
required.
2. Prepare seed beds:
• Scratching the surface: The cultivator can be used to
break the surface of the soil to allow for planting.
• Prepare for field sowing: Large planting beds such as
lawns can be prepared for planting.
3. Garden clean-up in fall:
• Rake: The cultivator can be used to remove vines
and other plant residue after the growing season.
• Level old growth: After plant residue has been
removed, the area can be leveled to prepare the area for
the next season.
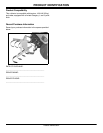
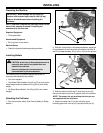
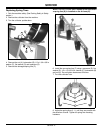
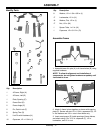
Adjusting Frame Width
NOTE: Tine spacing is changed when the frame width
is adjusted.
1. Park the machine safely. (See Parking Safely in Safety
section.)
2. Lower the cultivator until the bottom of the spring tines
are approximately 25 mm (1 in.) off the ground.
MX13266
3. Loosen the capscrews and nuts (A) at the front A-frame
and at the front of the frame struts (B).
NOTE: To obtain the desired width, it may be necessary
to remove the capscrew, nut and washers, and move
the rear of the frame struts to another mounting hole.
4. Loosen the capscrews and nuts (C) at the rear of the
frame struts.
5. Move the right (D) and left (E) frame angles in or out
until the desired width is obtained.
6. Tighten the capscrews and nuts (C) at the rear of the
frame struts.
7. Move the spring tines (F) until they are parallel with the
direction of travel.
8. Tighten the capscrews and nuts (A) at the front A-frame
and at the front of the frame struts (B).
9. Loosen the capscrews and nuts for each remaining pair
of spring tines (G - I), adjust until parallel with the direction
of travel, and tighten the capscrews and nuts.
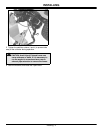
Changing Spring Tine Spacing
The spring tine spacing can be changed by moving the
spring tines to any one of the slotted mounting holes in the
frame. Spacing can also be changed by adjusting the frame
width.
1. Park the machine safely. (See Parking Safely in Safety
section.)
2. Lower the cultivator until the bottom of the spring tines
are approximately 25 mm (1 in.) off the ground.
C
A
A
B
F
G
H
I
E
D
C