


Operator’s Manual 25
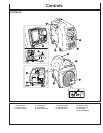
OPERATION
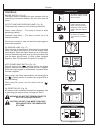
STARTING THE GENERATOR:
CAUTION: CHECK THE OIL LEVEL BEFORE EACH
OPERATION AS OUTLINED ON PAGE 21.
1. Make sure all appliances are disconnected from the
generator.
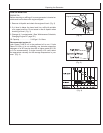
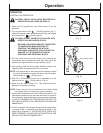
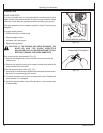
2. Turn engine switch to the “ “ (CHOKE) position (Fig. 7).
(When the engine is warm or temperature is high, start engine
with the switch at “ “ (RUN) position).
CAUTION: DO NOT CONNECT APPLIANCES WITH
DEFECTIVE LINES AND/OR PLUGS.
BE SURE APPLIANCES ARE NOT CONNECTED
TO GENERATOR WHEN STARTING UP.
STARTING THE GENERATOR WITH AN
APPLIANCE CONNECTED COULD RESULT IN
DAMAGE TO THE GENERATOR AND/OR
APPLIANCE AND PERSONAL INJURY.
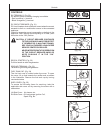
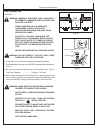
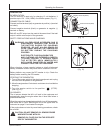
3. Pull the recoil starter handle slowly until passing the
compression point (resistance will be felt), then return the
handle to its original position and pull briskly. (Fig. 8)
4. After starting, allow the recoil starter handle to return to its
original position with the handle still in your hand.
NOTE: If the engine fails to start after several attempts, repeat
the starting procedures mentioned above with the engine
switch placed at “ “ (RUN) position.
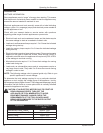
5. After 20 to 30 seconds of warm-up is completed, turn the
engine switch to “ “ (RUN) position. (Fig. 9)
6. Make sure the output lamp is on. This indicates that the
generator is properly operating.
NOTE: Please consult with an authorized John Deere Dealer
if the output lamp is off during the proper operation.
7. Test the GFCI receptacle on the unit. Push the test button. The
reset button should pop out and there should be no power at
the receptacle. Apply a test load or lamp to each receptacle
to verify. IF THE RESET BUTTON DOES NOT POP OUT, DO
NOT USE THE RECEPTACLE. SEE DEALER FOR SERVICE
IMMEDIATELY.
8. If GFCI receptacle test correctly, firmly push the reset button
to restore power. A distinctive click should be heard or felt
when this is complete. IF THE RECEPTACLE DOES NOT
RESET PROPERLY, DO NOT USE THE RECEPTACLE. SEE
DEALER FOR SERVICE IMMEDIATELY.
Operation
(Fig. 7)
(Fig. 9)
Recoil Starter Handle
Pull Briskly
(Fig. 8)