


Assembly 29
5WPMAN0879 (3/18/2011)
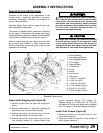
ASSEMBLY INSTRUCTIONS
DEALER SET-UP INSTRUCTIONS
Assembly of this mower is the responsibility of the
Frontier dealer. If should be delivered to the owner
completely assembled, lubricated, and adjusted for
normal cutting conditions.
Complete Dealer Check Lists on page 33 when you
have completed the assembly.
The mower is shipped partially assembled. Assembly
will be easier if components are aligned and loosely
assembled before tightening hardware. Recommended
torque values for hardware are located on page 43.
Select a suitable working area. Open parts boxes and
lay out parts and hardware to make location easy.
Refer to illustrations, accompanying text, parts lists and
exploded view drawings.
Before working underneath, carefully read Oper-
ator’s Manual instructions, disconnect driveline,
raise mower, securely block up all corners with
jackstands, and check stability. Secure blocking
prevents equipment from dropping due to hydrau-
lic leak down, hydraulic system failures, or
mechanical component failures.
Always wear relatively tight and belted clothing
to avoid getting caught in moving parts. Wear
sturdy, rough-soled work shoes and protective
equipment for eyes, hair, hands, hearing, and head;
and respirator or filter mask where appropriate.
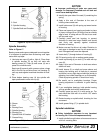
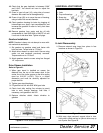
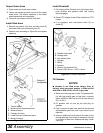
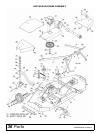
Figure 28. Shipping Unit
Disassemble Shipping Unit (Figure 28)
1. Remove all parts that are wired and strapped to
mower.
2. Remove wood blocks (1) and chain shielding (2)
attached to front of mower. Discard blocks.
3. Remove cap screws (12) and lock nuts (15) from
rear shipping bracket (3). Discard bracket.
4. Remove cap screw (14) and lock nuts (15) from
front shipping bracket (4). Discard bracket and
replace hardware through PTO hanger (5),
diagonal braces (6), A-frame bars (7), U-link (8)
and sleeve (9). Do not over tighten lock nut against
the PTO hanger. PTO hanger should rotate freely.
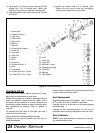
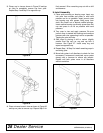
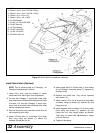
Install Front Casters (Figure 28)
1. Remove cap screws (13) and lock nuts (15) from
outer caster arms (10).
2. Place arms inside of pockets in front corners of
deck. Replace hardware.
CAUTION
1. Wood Blocks
2. Chain Shielding
3. Rear Shipping Bracket
4. Front Shipping Bracket
5. PTO Hanger
6. Diagonal Brace
7. A-Frame Bar
8. U-Link
9. Sleeve
10. Caster Arms
11. Hitch Arms
12. 1/2 NC x 1-1/2 HHCS
13. 1/2 NC x 4 HHCS
14. 1/2 NC x 6-1/2 HHCS
15. 1/2 NC Flange Lock Nut
16. 5/8 NC x 3-1/2 HHCS
17. 5/8 NC Flange Lock Nut