


12
The other steam outlet (on the fitted-out wall) has already been
connected by the manufacturer.
ƽ
IMPORTANT! Be careful not to exchange the
two pipes.
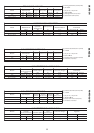
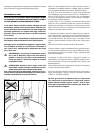
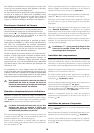
ELECTRIC CONNECTION OFSHOWERENCLOSURE
(MOD. ELT10/11)
Remove the insulating protective devices from the electric
cable on the corner of the tub (coming from the electric box
of the tub), and connect the cable to the junction box (
✐
10, details 1 and 2), respecting its polarity (brown:
phase; blue: neutral; green and yellow: earth).
• Connect the two cables coming from the electric wiring box,
positioned in the left corner, for the tub (
✐
10, detail 1).
• Take off the wiring junction box cover, remove the insulat-
ing protection from the wires of cable B and connect this to
the terminal board (detail 2), according to polarity (brown:
phase, blue: neutral, yellow/green: earth).
• Repeat the same operations for the cable (A) with only two
wires, connecting it to the right terminal board.
ṇ
Carefully tighten the cable clamp, and close
the junction box, taking care to position its lid
correctly.
UNIPOTENTIAL CONNECTION
(MOD.ST2)
In ST2 models, pass the green-and-yellow cable with Faston
connector (coming from the terminal screwed to the frame-
work of the fitted-out wall and marked with symbol ),
through the cable clamp on the tub rim (
✐
10, detail 3)
and connect it to the terminal near the pump, marked with
symbol .
ṇ
Carefully tighten the cable clamp, in order to
avoid dripping under the tub.
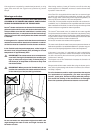
Installation of wall with mirror
Apply a small quantity of silicone around the holes indicated in
✐
11, detail 1.
Position the wall with mirror, place it against the fitted-out wall,
and fasten it to the latter by means of 6 screws, 6 nuts and 12
(6+6) washers (
✐
11, detail 2).
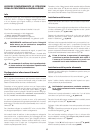
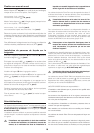
Assembly of fixed glass panel
Remove from the wooden crate the fixed glass pane, the sliding
door, the upright, the upper guide, the lower guide, and the two
compensators for fastening the structure to the wall.
ṇ
The lower guide is the one with the gasket.
(See
✐
12): Apply silicone to the lower guide for all the length
of the glass pane (stage 1) and on its head (stage 2).
Position the guide on the upside-down glass pane. Keeping the
guide against the upright of the glass pane, fasten it with 1 screw
(stage 3) Then fasten the guide to the upright with 2 screws
(stage 4).
Overturn the structure and position the upper guide on the fixed
glass pane. Repeat these operations for the lower guide
(stages 5, 6, 7, 8).
Apply silicone to the heads of the guides that are still free (stage
9), and fasten the upright to the guides by means of 4 (2+2)
screws (stage 10).
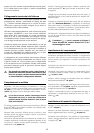
Installation of fixed glass panel
Apply silicone around the holes on the tub rim (
✐
13, details 1,
4, 5 and 5a
).
Position the assembled glass pane on the tub rim and fasten it to
the uprights of the fitted-out wall and to the wall with mirror, by
means of (5+5) screws (
✐
13, details 2 and 3).
From under the tub rim, fasten the glass pane by means of:
4 screws for the lower guide (
✐
13, detail 4).
2 (1+1) screws for the uprights (
✐
13, details 5 and 5a).
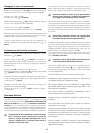
Fasten the fitted-out wall to the tub for good by completely tight-
ening the screws of the framework (
✐
6, details 1 and 2).
Apply a small quantity of silicone to the entire mating profile of
the fitted-out wall with the wall with mirror (
✐
14, detail 1).
Carefully apply silicone to the mating profile of the walls with the
tub edge (
✐
14, details 2 and 4) and of the walls with the
uprights of the glass panes (detail 3).
These applications of silicone ensure that the system is water-
proof during normal use, and even in particular conditions, for
instance when the shower is directed to the points of junction
between the various elements.
Installation of roof (if any)
This operation must be performed by at least two persons. Place
the roof upon the fitted-out wall, the wall with mirror and the
glass pane guide (
✐
15): the edge of the roof must fit in the
race of the upper guide (detail 1).
Pass the rubber pipe (the only pipe that is not connected and
comes from the solenoid valve assembly) through the hole on he
roof (detail 2). Fasten it to the pipe fitting of the revolving
shower (detail 3).
Connection of telephone (if any)
Version ELT10 is equipped with a speakerphone whose con-
trols are built into the electronic display.
To activate it, connect it to a suitably provided telephone
socket, using the cable that is bundled and fastened to the
back of the shower enclosure (it is approximately 10 metres
long). For this connection, you must provide a track in the wall
or an external raceway in which the cable will be routed up to
the telephonic socket.
It is the customer’s responsibility to choose the position of the
telephone socket, depending on the length of the cable sup-
plied.