


15
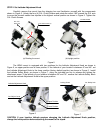
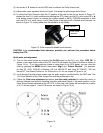
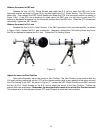
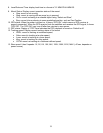
Balance the mount in DEC axis
Release the four (4) R.A. Clutch Screws and rotate the R.A. axis to place the DEC axis in the
horizontal position, as shown in Figure 16(a), and then tighten the R. A. Clutch Screws. The OTA can be on
either side. Then release the DEC Clutch Handle and rotate the OTA to a horizontal position as shown in
Figure 16(b). If the OTA has a tendency to rotate about the DEC axis, you will have to slide the OTA
forward or backward to balance it in the horizontal position about the DEC axis. When the OTA is balanced
horizontally, tighten the DEC Handle.
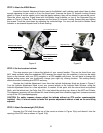
Balance the mount in R.A. axis
Release the four (4) R.A. Clutch Screws. If the DEC axis stays in the horizontal position, as shown
in Figure 16(a), it means the R.A. axis is balanced. Otherwise, release the CW Locking Screw and move
the CW as required to balance the R.A. axis. Tighten the CW Locking Screw.
(a) (b)
Figure 16
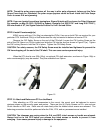
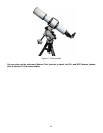
Adjust the mount to Zero Position
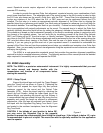
After polar alignment, adjust the mount at Zero Position. The Zero Position is the position with the
CW shaft pointing toward the ground, OTA at the highest position with its axis parallel to the polar axis and
the OTA pointing to the NCP, as shown in Figure 17. Loosen the DEC Clutch Handle on the DEC axis and
the four (4) R.A. Clutch Screws on the R.A. axis to adjust the mount to the Zero Position. Tighten the
screws after each adjustment. Remember, the hand controller needs to be at the Zero Position as well!
The simplest way is turn the mount power OFF and ON again to reset the hand controller.