


4 INSTALLATION
Part No. 1167458
15 Invacare® TheraPure™ Recessed Whirlpool Tubs
4.1 Preparing the Work Area
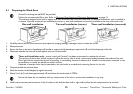
1. Carefully remove the tub from the carton and inspect for shipping damage. If damage is found, contact the carrier.
2. Measure the tub.
3. Ensure the floor in the area of installation will be able to support the 66 pounds per square inch (45 n/cm²) load capacity of the tub.
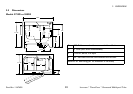
4. Determine whether the unit will be built against one, two or three walls.
5. Temporarily slide the tub into place.
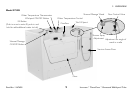
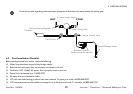
6. Mark the location of the fiberglass lip against the studs.
7. Mount 2-inch by 2-inch cleats approximately 1/8-inch below the marks made in STEP 6.
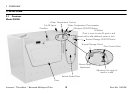
8. Install a service access panel (minimum 16 by 14-inches on the wall (the back wall or right wall) to allow the tub components to be serviced.
Access for servicing the tub MUST be provided.
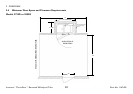
Follow the recommended floor plan. Refer to Minimum Floor Space and Clearance Requirements
on page 12.
The tubs are designed to be built-in against one, two or three walls, much the same way a traditional tub/shower unit is installed in
an alcove. Optional end panels are available for corner or one wall installation and are only available at the time of the tub order.
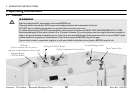
Three wall installation only - ensure a stud wall “pocket” has been constructed to receive the tub unit.
The opening of the pocket should be sized to allow the tub to slide in easily, without any binding between the studs and the tub.
Minor gaps can be covered by drywall or paneling. In remodeling situations, where tub or shower units have been removed, it may
be necessary to modify the pocket to receive the tub.
If desired, a wooden nailer may be attached to the stud walls as an additional mounting fixture for the tub.
Ensure the cleats do not interfere with any components of the tub or restrict the installation in any way.
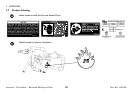
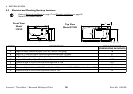
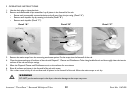
One wall installation
Two wall installation (corner)
Three wall installation (recessed)