


5 OPERATING INSTRUCTIONS
Part No. 1167457
25 Invacare
®
TheraPure™ Side Entry Whirlpool Tubs
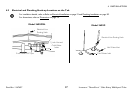
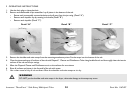
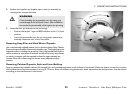
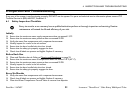
8. Replace the impeller and impeller cap on each jet assembly by
rotating them counterclockwise.
9. Assemble each jet assembly to the jet casings.
• Position the Sanijet® logo and RED indicator at the 11 o’clock
position.
• Insert the jet assembly into the jet casing and rotate the jet
assembly clockwise until it locks into place.
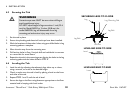
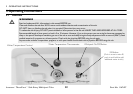
Removing Soap Film and Hard Water Deposits
Use a commercially available cleaner such as Invacare Heavy Duty Cleaner.
Remove the jet assemblies. Remove the impeller caps. Thoroughly spray the
exposed surfaces, including the jet casings. Use a long handled soft brush or
similar product to wipe down all surfaces and allow the heavy duty cleaner
to remain in contact with the exposed surfaces for approximately ten
minutes. Rinse off surfaces using the shower wand, adjusted to spray
position.
Removing Calcium Deposits, Scale and Lime Build-up
Spray a commercially available cleaner (full strength) for the intended application on all surfaces to be cleaned. Allow the cleaner to remain in contact
with surfaces for at least five minutes to as long as 12 hours. Rinse off surfaces using the shower wand, adjusted to the spray position. Use the cleaner
according to the manufacturer's instructions.
ƽ
WARNING
Cross-threading the jet assembly onto the casing may
cause damage to the whirlpool motor. After installation,
ensure that the jet assembly is flush against the jet casing.
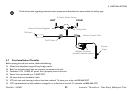
Jet Casing
Jet
Assembly
Sanijet®
Logo