


Storage
2007 HUV 4421 Gasoline and Diesel Vehicle Owner’s Manual Page 27
3. Make sure the key switch is in the OFF position and the Forward/Reverse handle is in the NEUTRAL
position. Chock the wheels.
Gasoline vehicles:
4. Prepare the fuel tank.
4.1. Fill the tank with fresh fuel.
4.2. Following the manufacturer’s directions, add a commercially available fuel stabilizer (such as Sta-
Bil
®
). Run the engine in a well-ventilated area to allow treated fuel to replace untreated fuel in the
carburetor.
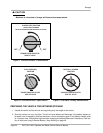
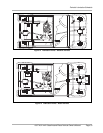
4.3. Disconnect the fuel vent line from the fuel tank vent nipple (Figure 36, Page 44).
4.4. Plug the fuel tank vent nipple so that it is air tight. Husqvarna recommends using a slip-on vinyl cap.
5. Remove both spark plugs, and pour 1/2 ounce (14.2 mL) of SAE 10 weight oil through each of the two
spark plug holes. Rotate the engine crankshaft by hand several times, then install both spark plugs.
Diesel vehicles: If Biodiesel fuel is used, see Biodiesel Fuel (Diesel Vehicles Only) on page 44.
6. Prepare the fuel tank.
6.1. Fill the fuel tank with fresh fuel.
6.2. Disconnect the fuel vent line from the fuel tank vent nipple (Figure 37, Page 44).
6.3. Plug the fuel tank vent nipple so that it is air tight. Husqvarna recommends using a slip-on vinyl cap.
All vehicles:
7. Change engine oil. See Engine Oil and Filter Change on page 36.
8. Disconnect the battery cables, negative (–) cable first. See WARNING “To avoid unintentionally start-
ing...” on page 9.
9. The battery should be clean and free of corrosion. Wash the battery top and terminals with a solution of
baking soda and water (1 cup (237 mL) baking soda per 1 gallon (3.8 L) of water). Rinse the solution off
the battery. Do not allow this solution to enter the battery. Be sure the terminals are tight. Let the terminals
dry and then coat them with Battery Terminal Protector Spray (P/N 603 00 00-03).
10. Adjust the tires to the recommended tire pressure. See Vehicle Specifications on page 51.
11. Perform semiannual periodic lubrication. See Periodic Lubrication Schedule on page 32.
12. Thoroughly clean the front body, rear body, seats, cargo bed, engine compartment, and underside of
vehicle.
13. Do not engage the park brake. Chock the wheels to prevent the vehicle from rolling.
RETURNING THE STORED VEHICLE TO SERVICE
1. Make sure the key switch is in the OFF position and the Forward/Reverse handle is in the NEUTRAL
position. Chock the wheels.
2. Restore the fuel system to operation (Figure 36 or Figure 37, Page 44).
2.1. Remove the plug from the fuel tank vent.
2.2. Connect the vent tube to the fuel tank vent.
3. Connect the battery cables, positive (+) cable first, and tighten the terminals to 144 in-lb (16 N·m). Coat
terminals with Battery Terminal Protector Spray (P/N 603 00 00-03).
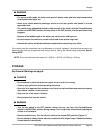
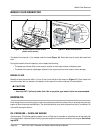
4. Gasoline vehicles only: Completely open the fuel shut-off valve (Figure 12, Page 26). Ensure the
valve is fully open. A partially closed fuel shut-off valve combined with the use of the choke can result in
a fouled spark plug and engine failure (Figure 13, Page 26).