


21
ENGINE OIL FILTER
Replace the engine oil filter every season or every other oil
change if the tractor is used more than 100 hours in one year.
MUFFLER
Inspect and replace corroded muffler and spark arrester (if
equipped) as it could create a fire hazard and/or damage.
SPARK PLUGS
Replace spark plugs at the beginning of each mowing
season or after every 100 hours of operation, whichever
occurs first. Spark plug type and gap setting are shown in
“PRODUCT SPECIFICATIONS” section of this manual.
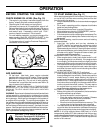
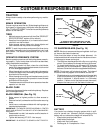
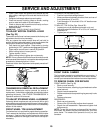
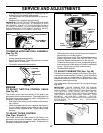
IN-LINE FUEL FILTER (See Fig. 23)
The fuel filter should be replaced once each season. If fuel
filter becomes clogged, obstructing fuel flow to carburetor,
replacement is required.
• With engine cool, remove filter and plug fuel line sec-
tions.
• Place new fuel filter in position in fuel line with arrow
pointing towards carburetor.
• Be sure there are no fuel line leaks and clamps are
properly positioned.
• Immediately wipe up any spilled gasoline.
FIG. 23
FUEL FILTER
CLAMP
CLAMP
CLEANING
• Clean engine, battery, seat, finish, etc. of all foreign
matter.
• Keep finished surfaces and wheels free of all gasoline,
oil, etc.
• Protect painted surfaces with automotive type wax.
We do not recommend using a garden hose to clean your
tractor unless the electrical system, muffler, air filter and
carburetor are covered to keep water out. Water in engine
can result in a shortened engine life.
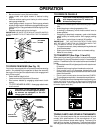
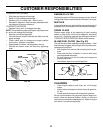
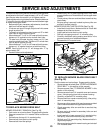
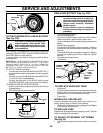
NUT
RUBBER
SEAL
CARTRIDGE
FOAM
PRE-CLEANER
CARTRIDGE
PLATE
KNOB
FIG. 22
CUSTOMER RESPONSIBILITIES
TO SERVICE PRE-CLEANER
• Slide foam pre-cleaner off cartridge.
• Wash it in liquid detergent and water.
• Squeeze it dry in a clean cloth. Allow it to dry.
• Saturate it in engine oil. Wrap it in clean, absorbent cloth
and squeeze to remove excess oil.
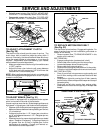
TO SERVICE CARTRIDGE
• Replace a dirty, bent, or damaged cartridge.
NOTE: Do not wash the paper cartridge or use pressurized
air, as this will damage the cartridge.
• Remove nut and cartridge plate.
• Reinstall the pre-cleaner (cleaned and oiled) over the
paper cartridge.
• Check rubber seal for damage and proper position
around stud. Replace if necessary.
• Reassemble air cleaner, cartridge plate, and nut.
• Reinstall air cleaner cover and secure by tightening
knob.